Step-by-Step Tutorial to Building Your First Machine Learning Model

Build Your First Machine Learning Model
Image by pch.vector on Freepik

Hi everyone! I am sure you are reading this article because you are interested in a machine-learning model and want to build one.

You may have tried to develop machine learning models before or you are entirely new to the concept. No matter your experience, this article will guide you through the best practices for developing machine learning models.

In this article, we will develop a Customer Churn prediction classification model following the steps below:

1. Business Understanding
2. Data Collection and Preparation

  • Collecting Data
  • Exploratory Data Analysis (EDA) and Data Cleaning
  • Feature Selection

3. Building the Machine Learning Model

  • Choosing the Right Model
  • Splitting the Data
  • Training the Model
  • Model Evaluation

4. Model Optimization

5. Deploying the Model

Let's get into it if you are excited about building your first machine learning model.

Understanding the Basics

Before we get into the machine learning model development, let’s briefly explain machine learning, the types of machine learning, and a few terminologies we will use in this article.

First, let’s discuss the types of machine learning models we can develop. Four main types of Machine Learning often developed are:

  • Supervised Machine Learning is a machine learning algorithm that learns from labeled datasets. Based on the correct output, the model learns from the pattern and tries to predict the new data. There are two categories in Supervised Machine Learning: Classification (Category prediction) and Regression (Numerical prediction).
  • Unsupervised Machine Learning is an algorithm that tries to find patterns in data without direction. Unlike supervised machine learning, the model is not guided by label data. This type has two common categories: Clustering (Data Segmentation) and Dimensionality Reduction (Feature Reduction).
  • Semi-supervised machine learning combines the labeled and unlabeled datasets, where the labeled dataset guides the model in identifying patterns in the unlabeled data. The simplest example is a self-training model that can label the unlabeled data based on a labeled data pattern.
  • Reinforcement Learning is a machine learning algorithm that can interact with the environment and react based on the action (getting a reward or punishment). It would maximize the result with the rewards system and avoid bad results with punishment. An example of this model application is the self-driving car.

You also need to know a few terminologies to develop a machine-learning model:

  • Features: Input variables used to make predictions in a machine learning model.
  • Labels: Output variables that the model is trying to predict.
  • Data Splitting: The process of data separation into different sets.
  • Training Set: Data used to train the machine learning model.
  • Test Set: Data used to evaluate the performance of the trained model.
  • Validation Set: Data use used during the training process to tune hyperparameters
  • Exploratory Data Analysis (EDA): The process of analyzing and visualizing datasets to summarize their information and discover patterns.
  • Models: The outcome of the Machine Learning process. They are the mathematical representation of the patterns and relationships within the data.
  • Overfitting: Occurs when the model is generalized too well and learns the data noise. The model can predict well in the training but not in the test set.
  • Underfitting: When a model is too simple to capture the underlying patterns in the data. The model performance in training and test sets could be better.
  • Hyperparameters: Configuration settings are used to tune the model and are set before training begins.
  • Cross-validation: a technique for evaluating the model by partitioning the original sample into training and validation sets multiple times.
  • Feature Engineering: Using domain knowledge to get new features from raw data.
  • Model Training: The process of learning the parameters of a model using the training data.
  • Model Evaluation: Assessing the performance of a trained model using machine learning metrics like accuracy, precision, and recall.
  • Model Deployment: Making a trained model available in a production environment.

With all this basic knowledge, let’s learn to develop our first machine-learning model.

1. Business Understanding

Before any machine learning model development, we must understand why we must develop the model. That’s why understanding what the business wants is necessary to ensure the model is valid.
Business understanding usually requires a proper discussion with the related stakeholders. Still, since this tutorial does not have business users for the machine learning model, we assume the business needs ourselves.

As stated previously, we would develop a Customer Churn prediction model. In this case, the business needs to avoid further churn from the company and wants to take action for the customer with a high probability of churning.
With the above business requirements, we need specific metrics to measure whether the model performs well. There are many measurements, but I propose using the Recall metric.

In monetary values, it might be more beneficial to use Recall, as it tries to minimize the False Negative or decrease the amount of prediction that was not churning while it’s churning. Of course, we can try to aim for balance by using the F1 metric.

With that in mind, let's get into the first part of our tutorial.

2. Data Collection and Preparation

Data Collection

Data is the heart of any machine learning project. Without it, we can’t have a machine learning model to train. That’s why we need quality data with proper preparation before we input them into the machine learning algorithm.

In a real-world case, clean data does not come easily. Often, we need to collect it through applications, surveys, and many other sources before storing it in data storage. However, this tutorial only covers collecting the dataset as we use the existing clean data.

In our case, we would use the Telco Customer Churn data from the Kaggle. It’s open-source classification data regarding customer history in the telco industry with the churn label.

Exploratory Data Analysis (EDA) and Data Cleaning

Let’s start by reviewing our dataset. I assume the reader already has basic Python knowledge and can use Python packages in their notebook. I also based the tutorial on Anaconda environment distribution to make things easier.

To understand the data we have, we need to load it into a Python package for data manipulation. The most famous one is the Pandas Python package, which we will use. We can use the following code to load and review the CSV data.

import pandas as pd    df = pd.read_csv('WA_Fn-UseC_-Telco-Customer-Churn.csv')  df.head()  

Step-by-Step Tutorial to Building Your First Machine Learning Model

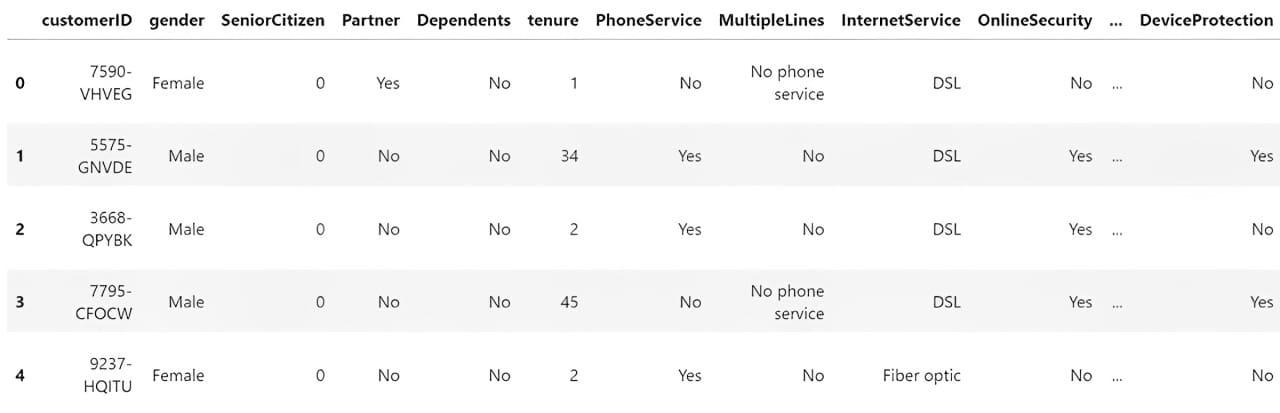
Next, we would explore the data to understand our dataset. Here are a few actions that we would perform for the EDA process.

1. Examining the features and the summary statistics.
2. Checks for missing values in the features.
3. Analyze the distribution of the label (Churn).
4. Plots histograms for numerical features and bar plots for categorical features.
5. Plots a correlation heatmap for numerical features.
6. Uses box plots to identify distributions and potential outliers.

First, we would check the features and summary statistics. With Pandas, we can see our dataset features using the following code.

# Get the basic information about the dataset  df.info()  
Output>>    RangeIndex: 7043 entries, 0 to 7042  Data columns (total 21 columns):   #   Column            Non-Null Count  Dtype    ---  ------            --------------  -----     0   customerID        7043 non-null   object    1   gender            7043 non-null   object    2   SeniorCitizen     7043 non-null   int64     3   Partner           7043 non-null   object    4   Dependents        7043 non-null   object    5   tenure            7043 non-null   int64     6   PhoneService      7043 non-null   object    7   MultipleLines     7043 non-null   object    8   InternetService   7043 non-null   object    9   OnlineSecurity    7043 non-null   object    10  OnlineBackup      7043 non-null   object    11  DeviceProtection  7043 non-null   object    12  TechSupport       7043 non-null   object    13  StreamingTV       7043 non-null   object    14  StreamingMovies   7043 non-null   object    15  Contract          7043 non-null   object    16  PaperlessBilling  7043 non-null   object    17  PaymentMethod     7043 non-null   object    18  MonthlyCharges    7043 non-null   float64   19  TotalCharges      7043 non-null   object    20  Churn             7043 non-null   object   dtypes: float64(1), int64(2), object(18)  memory usage: 1.1+ MB  

We would also get the dataset summary statistics with the following code.

# Get the numerical summary statistics of the dataset  df.describe()    # Get the categorical summary statistics of the dataset  df.describe(exclude = 'number')  

Step-by-Step Tutorial to Building Your First Machine Learning Model

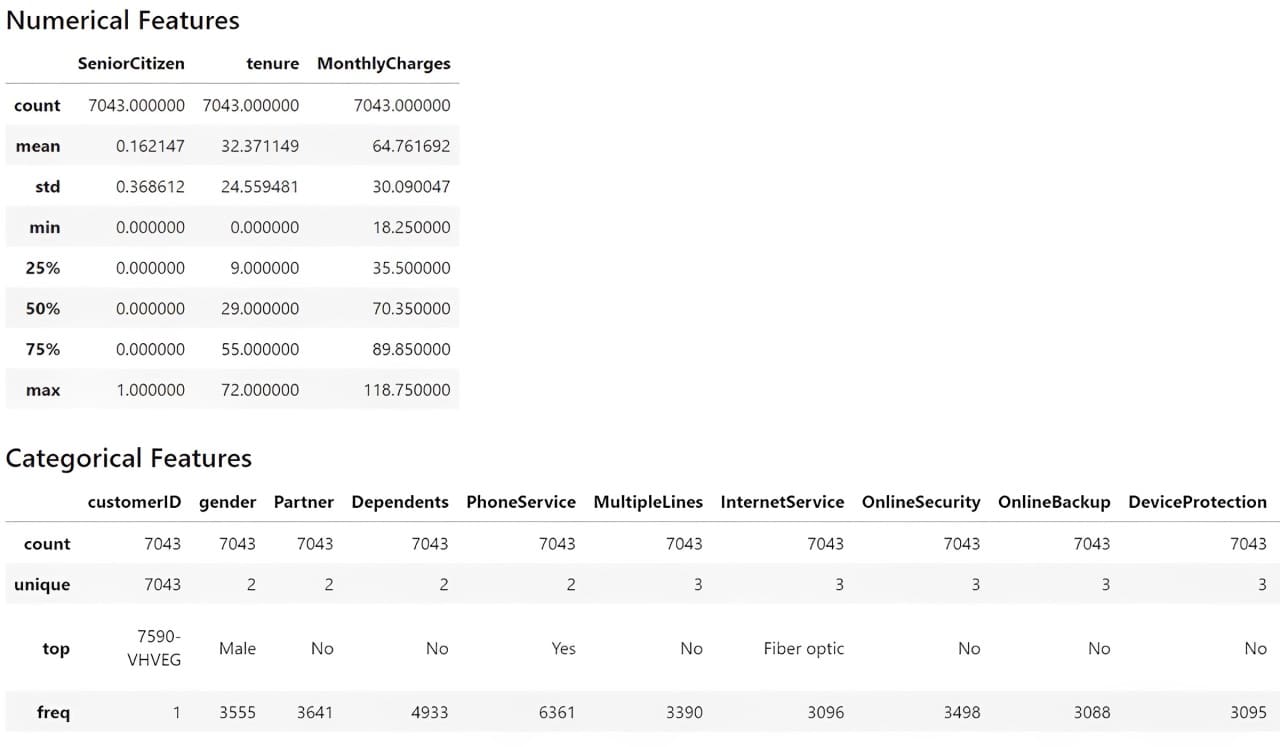
From the information above, we understand that we have 19 features with one target feature (Churn). The dataset contains 7043 rows, and most datasets are categorical.

Let’s check for the missing data.

# Check for missing values  print(df.isnull().sum())  
Output>>  Missing Values:  customerID          0  gender              0  SeniorCitizen       0  Partner             0  Dependents          0  tenure              0  PhoneService        0  MultipleLines       0  InternetService     0  OnlineSecurity      0  OnlineBackup        0  DeviceProtection    0  TechSupport         0  StreamingTV         0  StreamingMovies     0  Contract            0  PaperlessBilling    0  PaymentMethod       0  MonthlyCharges      0  TotalCharges        0  Churn               0  

Our dataset does not contain missing data, so we don’t need to perform any missing data treatment activity.
Then, we would check the target variable to see if we have an imbalance case.

print(df['Churn'].value_counts())  
Output>>  Distribution of Target Variable:  No     5174  Yes    1869  

There is a slight imbalance, as only close to 25% of the churn occurs compared to the non-churn cases.

Let’s also see the distribution of the other features, starting with the numerical features. However, we would also transform the TotalCharges feature into a numerical column, as this feature should be numerical rather than a category. Additionally, the SeniorCitizen feature should be categorical so that I would transform it into strings. Also, as the Churn feature is categorical, we would develop new features that show it as a numerical column.

import numpy as np  df['TotalCharges'] = df['TotalCharges'].replace('', np.nan)  df['TotalCharges'] = pd.to_numeric(df['TotalCharges'], errors='coerce').fillna(0)    df['SeniorCitizen'] = df['SeniorCitizen'].astype('str')    df['ChurnTarget'] = df['Churn'].apply(lambda x: 1 if x=='Yes' else 0)    df['ChurnTarget'] = df['Churn'].apply(lambda x: 1 if x=='Yes' else 0)    num_features = df.select_dtypes('number').columns  df[num_features].hist(bins=15, figsize=(15, 6), layout=(2, 5))  

Step-by-Step Tutorial to Building Your First Machine Learning Model

We would also provide categorical feature plotting except for the customerID, as they are identifiers with unique values.

import matplotlib.pyplot as plt  # Plot distribution of categorical features  cat_features = df.drop('customerID', axis =1).select_dtypes(include='object').columns    plt.figure(figsize=(20, 20))  for i, col in enumerate(cat_features, 1):      plt.subplot(5, 4, i)      df[col].value_counts().plot(kind='bar')      plt.title(col)  

Step-by-Step Tutorial to Building Your First Machine Learning Model

We then would see the correlation between numerical features with the following code.

import seaborn as sns    # Plot correlations between numerical features  plt.figure(figsize=(10, 8))  sns.heatmap(df[num_features].corr())  plt.title('Correlation Heatmap')  

Step-by-Step Tutorial to Building Your First Machine Learning Model

The correlation above is based on the Pearson Correlation, a linear correlation between one feature and the other. We can also perform correlation analysis to categorical analysis with Cramer’s V. To make the analysis easier, we would install Dython Python package that could help our analysis.

pip install dython  

Once the package is installed, we will perform the correlation analysis with the following code.

from dython.nominal import associations    # Calculate the Cramer’s V and correlation matrix  assoc = associations(df[cat_features], nominal_columns='all', plot=False)  corr_matrix = assoc['corr']    # Plot the heatmap  plt.figure(figsize=(14, 12))  sns.heatmap(corr_matrix)  

Step-by-Step Tutorial to Building Your First Machine Learning Model

Lastly, we would check the numerical outlier with a box plot based on the Interquartile Range (IQR).

# Plot box plots to identify outliers  plt.figure(figsize=(20, 15))  for i, col in enumerate(num_features, 1):      plt.subplot(4, 4, i)      sns.boxplot(y=df[col])      plt.title(col)  

Step-by-Step Tutorial to Building Your First Machine Learning Model

From the analysis above, we can see that we should address no missing data or outliers. The next step is to perform feature selection for our machine learning model, as we only want the features that impact the prediction and are viable in the business.

Feature Selection

There are many ways to perform feature selection, usually done by combining business knowledge and technical application. However, this tutorial will only use the correlation analysis we have done previously to make the feature selection.

First, let’s select the numerical features based on the correlation analysis.

target = 'ChurnTarget'  num_features = df.select_dtypes(include=[np.number]).columns.drop(target)    # Calculate correlations  correlations = df[num_features].corrwith(df[target])    # Set a threshold for feature selection  threshold = 0.3  selected_num_features = correlations[abs(correlations) > threshold].index.tolist()  

You can play around with the threshold later to see if the feature selection affects the model's performance. We would also perform the feature selection into the categorical features.

categorical_target = 'Churn'    assoc = associations(df[cat_features], nominal_columns='all', plot=False)  corr_matrix = assoc['corr']    threshold = 0.3  selected_cat_features = corr_matrix[corr_matrix.loc[categorical_target] > threshold ].index.tolist()    del selected_cat_features[-1]  

Then, we would combine all the selected features with the following code.

selected_features = []  selected_features.extend(selected_num_features)  selected_features.extend(selected_cat_features)    print(selected_features)  
Output>>  ['tenure',   'InternetService',   'OnlineSecurity',   'TechSupport',   'Contract',   'PaymentMethod']  

In the end, we have six features that would be used to develop the customer churn machine learning model.

3. Building the Machine Learning Model

Choosing the Right Model

There are many considerations to choosing a suitable model for machine learning development, but it always depends on the business needs. A few points to remember:

  1. The use case problem. Is it supervised or unsupervised, or is it classification or regression? Is it Multiclass or Multilabel? The case problem would dictate which model can be used.
  2. The data characteristics. Is it tabular data, text, or image? Is the dataset size big or small? Did the dataset contain missing values? Depending on the dataset, the model we choose could be different.
  3. How easy is the model to be interpreted? Balancing interpretability and performance is essential for the business.

As a thumb rule, starting with a simpler model as a benchmark is often best before proceeding to a complex one. You can read my previous article about the simple model to understand what constitutes a simple model.

For this tutorial, let’s start with linear model Logistic Regression for the model development.

Splitting the Data

The next activity is to split the data into training, test, and validation sets. The purpose of data splitting during machine learning model training is to have a data set that acts as unseen data (real-world data) to evaluate the model unbias without any data leakage.

To split the data, we will use the following code:

from sklearn.model_selection import train_test_split    target = 'ChurnTarget'     X = df[selected_features]  y = df[target]    cat_features = X.select_dtypes(include=['object']).columns.tolist()  num_features = X.select_dtypes(include=['number']).columns.tolist()    #Splitting data into Train, Validation, and Test Set  X_train_val, X_test, y_train_val, y_test = train_test_split(X, y, test_size=0.2, random_state=42, stratify=y)    X_train, X_val, y_train, y_val = train_test_split(X_train_val, y_train_val, test_size=0.25, random_state=42, stratify=y_train_val)  

In the above code, we split the data into 60% of the training dataset and 20% of the test and validation set. Once we have the dataset, we will train the model.

Training the Model

As mentioned, we would train a Logistic Regression model with our training data. However, the model can only accept numerical data, so we must preprocess the dataset. This means we need to transform the categorical data into numerical data.

For best practice, we also use the Scikit-Learn pipeline to contain all the preprocessing and modeling steps. The following code allows you to do that.

from sklearn.compose import ColumnTransformer  from sklearn.pipeline import Pipeline  from sklearn.preprocessing import OneHotEncoder  from sklearn.linear_model import LogisticRegression  # Prepare the preprocessing step  preprocessor = ColumnTransformer(      transformers=[          ('num', 'passthrough', num_features),          ('cat', OneHotEncoder(), cat_features)      ])    pipeline = Pipeline(steps=[      ('preprocessor', preprocessor),      ('classifier', LogisticRegression(max_iter=1000))  ])    # Train the logistic regression model  pipeline.fit(X_train, y_train)  

The model pipeline would look like the image below.

Step-by-Step Tutorial to Building Your First Machine Learning Model

The Scikit-Learn pipeline would accept the unseen data and go through all the preprocessing steps before entering the model. After the model is finished training, let’s evaluate our model result.

Model Evaluation

As mentioned, we will evaluate the model by focusing on the Recall metrics. However, the following code shows all the basic classification metrics.

from sklearn.metrics import classification_report    # Evaluate on the validation set  y_val_pred = pipeline.predict(X_val)  print("Validation Classification Report:n", classification_report(y_val, y_val_pred))    # Evaluate on the test set  y_test_pred = pipeline.predict(X_test)  print("Test Classification Report:n", classification_report(y_test, y_test_pred))  

Step-by-Step Tutorial to Building Your First Machine Learning Model

As we can see from the Validation and Test data, the Recall for churn (1) is not the best. That’s why we can optimize the model to get the best result.

4. Model Optimization

We always need to focus on the data to get the best result. However, optimizing the model could also lead to better results. This is why we can optimize our model. One way to optimize the model is via hyperparameter optimization, which tests all combinations of these model hyperparameters to find the best one based on the metrics.

Every model has a set of hyperparameters we can set before training it. We call hyperparameter optimization the experiment to see which combination is the best. To do that, we can use the following code.

from sklearn.model_selection import GridSearchCV  # Define the logistic regression model within a pipeline  pipeline = Pipeline(steps=[      ('preprocessor', preprocessor),      ('classifier', LogisticRegression(max_iter=1000))  ])    # Define the hyperparameters for GridSearchCV  param_grid = {      'classifier__C': [0.1, 1, 10, 100],      'classifier__solver': ['lbfgs', 'liblinear']  }    # Perform Grid Search with cross-validation  grid_search = GridSearchCV(pipeline, param_grid, cv=5, scoring='recall')  grid_search.fit(X_train, y_train)    # Best hyperparameters  print("Best Hyperparameters:", grid_search.best_params_)    # Evaluate on the validation set  y_val_pred = grid_search.predict(X_val)  print("Validation Classification Report:n", classification_report(y_val, y_val_pred))    # Evaluate on the test set  y_test_pred = grid_search.predict(X_test)  print("Test Classification Report:n", classification_report(y_test, y_test_pred))  

Step-by-Step Tutorial to Building Your First Machine Learning Model

The results still do not show the best recall score, but this is expected as they are only the baseline model. Let’s experiment with several models to see if the Recall performance improves. You can always tweak the hyperparameter below.

from sklearn.tree import DecisionTreeClassifier  from sklearn.ensemble import RandomForestClassifier, GradientBoostingClassifier  from sklearn.svm import SVC  from xgboost import XGBClassifier  from lightgbm import LGBMClassifier  from sklearn.metrics import recall_score    # Define the models and their parameter grids  models = {      'Logistic Regression': {          'model': LogisticRegression(max_iter=1000),          'params': {              'classifier__C': [0.1, 1, 10, 100],              'classifier__solver': ['lbfgs', 'liblinear']          }      },      'Decision Tree': {          'model': DecisionTreeClassifier(),          'params': {              'classifier__max_depth': [None, 10, 20, 30],              'classifier__min_samples_split': [2, 10, 20]          }      },      'Random Forest': {          'model': RandomForestClassifier(),          'params': {              'classifier__n_estimators': [100, 200],              'classifier__max_depth': [None, 10, 20]          }      },      'SVM': {          'model': SVC(),          'params': {              'classifier__C': [0.1, 1, 10, 100],              'classifier__kernel': ['linear', 'rbf']          }      },      'Gradient Boosting': {          'model': GradientBoostingClassifier(),          'params': {              'classifier__n_estimators': [100, 200],              'classifier__learning_rate': [0.01, 0.1, 0.2]          }      },      'XGBoost': {          'model': XGBClassifier(use_label_encoder=False, eval_metric='logloss'),          'params': {              'classifier__n_estimators': [100, 200],              'classifier__learning_rate': [0.01, 0.1, 0.2],              'classifier__max_depth': [3, 6, 9]          }      },      'LightGBM': {          'model': LGBMClassifier(),          'params': {              'classifier__n_estimators': [100, 200],              'classifier__learning_rate': [0.01, 0.1, 0.2],              'classifier__num_leaves': [31, 50, 100]          }      }  }    results = []    # Train and evaluate each model  for model_name, model_info in models.items():      pipeline = Pipeline(steps=[          ('preprocessor', preprocessor),          ('classifier', model_info['model'])      ])            grid_search = GridSearchCV(pipeline, model_info['params'], cv=5, scoring='recall')      grid_search.fit(X_train, y_train)            # Best model from Grid Search      best_model = grid_search.best_estimator_            # Evaluate on the validation set      y_val_pred = best_model.predict(X_val)      val_recall = recall_score(y_val, y_val_pred, pos_label=1)            # Evaluate on the test set      y_test_pred = best_model.predict(X_test)      test_recall = recall_score(y_test, y_test_pred, pos_label=1)            # Save results      results.append({          'model': model_name,          'best_params': grid_search.best_params_,          'val_recall': val_recall,          'test_recall': test_recall,          'classification_report_val': classification_report(y_val, y_val_pred),          'classification_report_test': classification_report(y_test, y_test_pred)      })    # Plot the test recall scores  plt.figure(figsize=(10, 6))  model_names = [result['model'] for result in results]  test_recalls = [result['test_recall'] for result in results]  plt.barh(model_names, test_recalls, color='skyblue')  plt.xlabel('Test Recall')  plt.title('Comparison of Test Recall for Different Models')  plt.show()  

Step-by-Step Tutorial to Building Your First Machine Learning Model

The recall result has not changed much; even the baseline Logistic Regression seems the best. We should return with a better feature selection if we want a better result.

However, let’s move forward with the current Logistic Regression model and try to deploy them.

5. Deploying the Model

We have built our machine learning model. After having the model, the next step is to deploy it into production. Let’s simulate it using a simple API.

First, let’s develop our model again and save it as a joblib object.

import joblib    best_params = {'classifier__C': 1, 'classifier__solver': 'lbfgs'}  logreg_model = LogisticRegression(C=best_params['classifier__C'], solver=best_params['classifier__solver'], max_iter=1000)    preprocessor = ColumnTransformer(      transformers=[          ('num', 'passthrough', num_features),          ('cat', OneHotEncoder(), cat_features)    pipeline = Pipeline(steps=[      ('preprocessor', preprocessor),      ('classifier', logreg_model)  ])    pipeline.fit(X_train, y_train)    # Save the model  joblib.dump(pipeline, 'logreg_model.joblib')  

Once the model object is ready, we will move into a Python script to create the API. But first, we need to install a few packages used for deployment.

pip install fastapi uvicorn

We would not do it in the notebook but in an IDE such as Visual Studio Code. In your preferred IDE, create a Python script called app.py and put the code below into the script.

from fastapi import FastAPI  from pydantic import BaseModel  import joblib  import numpy as np    # Load the logistic regression model pipeline  model = joblib.load('logreg_model.joblib')    # Define the input data for model  class CustomerData(BaseModel):      tenure: int      InternetService: str      OnlineSecurity: str      TechSupport: str      Contract: str      PaymentMethod: str    # Create FastAPI app  app = FastAPI()    # Define prediction endpoint  @app.post("/predict")  def predict(data: CustomerData):      # Convert input data to a dictionary and then to a DataFrame      input_data = {          'tenure': [data.tenure],          'InternetService': [data.InternetService],          'OnlineSecurity': [data.OnlineSecurity],          'TechSupport': [data.TechSupport],          'Contract': [data.Contract],          'PaymentMethod': [data.PaymentMethod]      }           import pandas as pd      input_df = pd.DataFrame(input_data)           # Make a prediction      prediction = model.predict(input_df)           # Return the prediction      return {"prediction": int(prediction[0])}    if __name__ == "__main__":      import uvicorn      uvicorn.run(app, host="0.0.0.0", port=8000)  

In your command prompt or terminal, run the following code.

uvicorn app:app --reload  

With the code above, we already have an API to accept data and create predictions. Let’s try it out with the following code in the new terminal.

curl -X POST "http://127.0.0.1:8000/predict" -H "Content-Type: application/json" -d "{"tenure": 72, "InternetService": "Fiber optic", "OnlineSecurity": "Yes", "TechSupport": "Yes", "Contract": "Two year", "PaymentMethod": "Credit card (automatic)"}"  
Output>>  {"prediction":0}

As you can see, the API result is a dictionary with prediction 0 (Not-Churn). You can tweak the code even further to get the desired result.

Congratulation. You have developed your machine learning model and successfully deployed it in the API.

Conclusion

We have learned how to develop a machine learning model from the beginning to the deployment. Experiment with other datasets and use cases to get the feeling even better. All the code this article uses will be available on my GitHub repository.

Cornellius Yudha Wijaya is a data science assistant manager and data writer. While working full-time at Allianz Indonesia, he loves to share Python and data tips via social media and writing media. Cornellius writes on a variety of AI and machine learning topics.

More On This Topic

  • Step by Step Building a Vacancy Tracker Using Tableau
  • Deploying Your First Machine Learning Model
  • Building and Training Your First Neural Network with TensorFlow and Keras
  • From Zero to Hero: Create Your First ML Model with PyTorch
  • A Structured Approach To Building a Machine Learning Model
  • Deploying Your First Machine Learning API

SaaS is Far From Dead

SaaS is Not Dead Yet

AI has undeniably become the cool kid in town much, like Software as a Service (SaaS) startups were a few years ago. But today, AI enthusiasts are boldly declaring that SaaS is dead!

In recent online discussions, a debate has surfaced around the viability of SaaS in an era increasingly dominated by AI and economic uncertainty. While some industry insiders have proclaimed the “end of software”, a closer examination reveals that SaaS is not dead but is evolving.

It all started with the Salesforce saga and a report by Upekkha that SaaS startups would struggle in 2024. With its growth slowly declining, Salesforce, one of the most profitable software companies, doesn’t excite the investors anymore. Salesforce missing its earnings guidance for the first time in 73 quarters only added fuel to fire. Some even take the case of Workday, which saw its shares sink more than 15% last week.

On the other hand, Zoho, the bootstrapped unicorn SaaS giant, remains unaffected. The company’s founder Sridhar Vembu, recently took a dig at Salesforce for its disappointing quarterly numbers. Zoho continues to thrive and has not faced any layoffs, claiming to even have zero debt in the balance sheet.

Is AI to be blamed?

Thiyagarajan Maruthavanan, partner at Upekkha, put it rather simply – “Is SaaS dead? Depends on who you are asking.” He explained that investors will put their first fist on the table and say yes as that is where their biggest incentive is – in pointing out the outliers and calling that a trend. For founders in SaaS companies, it is all about adapting to the market shift and assessing the signals in the trend.

This points to the fact that SaaS is adapting and not dying; and is far from being obsolete. The current landscape is driving SaaS companies to innovate and rethink their business models. The notion that enterprises can simply build their own AI solutions is proving to be overly optimistic.

While some companies are attempting to develop in-house AI capabilities, many are finding this approach to be costly and complex. As a result, there remains a substantial market for specialised SaaS applications that offer AI-enhanced functionalities such as Snowflake, Databricks, and many others.

AI-as-a-service (AI-aaS) is the next evolution

AI capabilities are embedded into SaaS platforms, providing advanced analytics, automation, and intelligent decision-making tools. “Legacy and new SaaS companies will truly become AI-first, abstracting away the complexity of deploying LLMs,” said Matt Turck in his latest blog post.

Is SaaS dead?
What seems to be happening:
* tough macro, cost cutting
* AI sucking the air out of the room
* SaaS vendors perceived as “last generation” despite best efforts to add AI quickly
* enterprise budgets for AI are not net new, they’re taken from somewhere (SaaS…

— Matt Turck (@mattturck) June 8, 2024

The question that remains is what would happen to the current SaaS unicorns while this transition happens. Obviously there are a lot of extreme views about the industry, but none grounded in anything except hype.

“When I hear about the hard tech renaissance because SaaS is tough, I pause to reflect how absurd these statements are,” said Alex Iskold, managing partner at 2048 Ventures. “The undercurrent of these conversations is moats and long-term defensibility. SaaS in a crowded space is way less defensible these days – disruption is hard!” he added.

Most companies are investing in AI without any meaningful revenue out of it. Even though it is becoming easier for companies to build software using AI, this would only be true for some companies, not all. Hemant Mohapatra from Lightspeed India explains that we are now moving into the AI-cycle of SaaS, shifting away from the internet-driven 1st cycle.

SaaS Moats Might be Dead

Matteo Franceschetti raises a pertinent question: “Given the speed at which you can build SaaS products and services, will current SaaS companies keep expanding and dominate because they already have distribution or is there space for new SaaS companies starting from zero?”

The dynamic nature of the SaaS market presents opportunities for both established companies and new entrants. Turck replies saying that there is room for “intelligence first” SaaS startups with AI at the centre.

“Merely having data isn’t enough,” said Aaron Erickson. “SaaS with mediocre UI also dies if 90% of its use cases can be replaced via chatbot,” he added, citing the example of HR apps. “The world has a lot of very bad SaaS!”

This is perfectly illustrated by Will Gendron, who is currently bootstrapping a SaaS product without any coding experience. He said that the company will be profitable this year because “I’m the only developer” and that it was impossible without AI.

While another user on X said that switching to AI is extremely cost intensive and still would take years to be on par with AI when it comes to providing features.

“Software is not dead. But it certainly isn’t as easy as it once was,” said one of the industry leaders, noting that it is the worst sentiment ever. The only thing that SaaS now needs to adopt is AI as a service and move towards a transaction-based model instead of subscription-based, or a combination of both, as software with LLM has marginal costs.

The era of SaaS 3.0 is here and AI is at the centre of it.

The post SaaS is Far From Dead appeared first on AIM.

Siemens Taps AMD Instinct™ GPUs To Expand High-performance Hardware Options For Simcenter STAR-CCM+

Shutterstock 2184948531 Abstract glowing chip circuit hologram on dark backdrop. CPU and metaverse concept. 3D Rendering

Siemens recently announced that its Simcenter STAR-CCM+ multi-physics computational fluid dynamics (CFD) software now supports AMD Instinct™ GPUs for GPU-native computation. This move addresses its users’ needs for computational efficiency, reduced simulation costs and energy usage, and greater hardware choice.

Liam McManus, Technical Product Manager for Simcenter STAR-CCM+, said, “Our customers want to design faster, evaluate more designs further upstream, and accelerate their overall design cycle. To do that, they need to increase the throughput of their simulations.”

The Simcenter STAR-CCM+ team was naturally interested in the AMD Instinct MI200 series, including the MI210, MI250, and MI250X. McManus said, “We had a lot of familiarity, experience, and success with AMD CPUs. This made us comfortable exploring what we could achieve with AMD GPUs.”

GPUs accelerate bottom lines

The computational intensity of CFD historically burdens traditional CPU-based systems. Whether predicting the airflow around a new car model or optimizing the cooling systems for cutting-edge electronics, there is always a desire for faster design cycles—a challenge for industries where time-to-market and product performance are crucial. McManus added, “Today, it’s not just about simulating a component once. A simulation might be run a hundred times to optimize it and get the most efficient product possible.”

Siemens found that with AMD Instinct GPUs, CFD simulations that once took days can be completed in hours or even minutes without compromising the depth or accuracy of the analysis. McManus pointed out, “GPU hardware allows us to run more designs at the same hardware cost or start to look at higher fidelity simulations within the same timeframe as before.” This newfound speed enables a more exploratory approach to design, allowing engineers to test and refine multiple hypotheses in the time it once took to evaluate a single concept.

AMD Instinct MI200 GPUs stand apart

The AMD MI200 series innovative CDNA2 architecture offers high processing speeds and optimizes energy consumption, allowing for efficient handling of large datasets and complex calculations. Advanced features such as high-bandwidth memory (HBM), scalable multi-GPU connectivity, and enhanced computational precision collectively enhance the GPUs’ performance and efficiency across diverse computational tasks. The MI250 is further optimized for the highest performance levels in demanding tasks, including large-scale simulations (HPC), Deep Learning, and complex scientific calculations. Engineered for scalability and massive parallel processing (MPP) abilities, the MI250 excels in High Performance Computing and artificial intelligence (AI) workloads due to its exceptional computational throughput, memory bandwidth, core count, fast memory, and memory capacity.

“Just one AMD Instinct GPU card can provide the computational equivalent of 100 to 200 CPU cores,” said McManus. Of course, we can use multiple GPUs, meaning that we can offer customers significantly reduced per-simulation costs.”

Michael Kuron, a Siemens senior software engineer who led the port, emphasized, “One thing that makes AMD GPUs great is their high memory bandwidth. For CFD, we’re not really limited by pure numerical performance but by how fast the GPU can shuffle the data. AMD GPUs offer some of the highest memory bandwidth out there, making them an excellent platform for CFD applications.” He added, “Some of the world’s fastest supercomputers these days use AMD GPUs, so being able to run on them certainly doesn’t hurt.”

AMD ROCm and HIP smooth the transition

Of course, hardware was only part of the consideration. McManus said, “The AMD ROCm platform has been critical in ensuring that our software could fully leverage the computational power of AMD GPUs. Its open-source nature and comprehensive toolset have significantly eased the development and optimization of our applications.”

Kuron added, “Because the entire ROCm stack is open-source, I can look under the hood and fix things without waiting for any technical support.” Kuron continued, “In the ROCm ecosystem, all the runtime and math libraries, plus all the stuff built on top of those, are open source. We have excellent insight when new features and capabilities come in.”

ROCm™ software’s HIP programing language enabled a smooth transition of Simcenter STAR-CCM+’s existing codebase. Kuron explained, “Our existing CUDA software translates almost one-to-one to HIP, so the porting effort was much lower than rewriting it in another programming model like SYCL or OpenMP offloading. The actual change between CUDA and HIP was just a couple of hundred lines of code. Probably 95% of the change from CUDA to HIP was achieved using little more than find and replace, and the rest wasn’t difficult either.”

Kuron said, “Achieving one-to-one parity was a significant milestone that ensures our software delivers precise and reliable results consistently, whether running on AMD or any other hardware.”

Collaborating to serve the customer

Collaboration was pivotal to the project’s success. “AMD was very responsive to our feedback, working closely with us to refine the integration,” noted Kuron. “The opportunity to communicate directly with the AMD team members who implement these solutions and understand the technical details has been incredibly valuable.”

McManus said, “It’s great to collaborate with AMD. They’re developing the GPU solutions and we can work closely with them to ensure our software runs on it. Siemens and AMD have the same objective: to get the customer to the answer as fast as possible.”

Looking ahead to MI300 and beyond

Looking to the new AMD Instinct MI300 series, Kuron said, “We’re looking forward to the increase in memory bandwidth on the MI300 platform. The tighter coupling between CPU and GPU of the MI300A platform could help eliminate bottlenecks and speed up simulations that require some parts to run on the CPU.”

McManus adds, “The increase in memory capacity, up to 192 gigabytes for the MI300X, will reduce constraints on simulation complexity and allow larger problem sizes to be addressed more effectively.

We’re also exploring hybrid computational strategies for some CPU-bound simulation challenges and we’re particularly intrigued by the possibilities offered by the unified memory of the MI300A.”

Together, Siemens and AMD are addressing the evolving needs for quicker, more cost-effective design processes. Integrating Simcenter STAR-CCM+ with AMD Instinct GPUs broadens the range of tools available for computational fluid dynamics challenges, offering high simulation speed and cost efficiency and offering engineers a wider array of hardware options. The AMD MI300 series promises to expand these capabilities further, catering to an increasingly diverse and complex array of simulations, and very dynamic markets.

Disclaimers

The information presented in this document is for informational purposes only and may contain technical inaccuracies, omissions, and typographical errors. The information contained herein is subject to change and may be rendered inaccurate for many reasons, including but not limited to product and roadmap changes, component and motherboard version changes, new model and/or product releases, product differences between differing manufacturers, software changes, BIOS flashes, firmware upgrades, or the like. Any computer system has risks of security vulnerabilities that cannot be completely prevented or mitigated. AMD assumes no obligation to update or otherwise correct or revise this information. However, AMD reserves the right to revise this information and to make changes from time to time to the content hereof without obligation of AMD to notify any person of such revisions or changes. THIS INFORMATION IS PROVIDED ‘AS IS.” AMD MAKES NO REPRESENTATIONS OR WARRANTIES WITH RESPECT TO THE CONTENTS HEREOF AND ASSUMES NO RESPONSIBILITY FOR ANY INACCURACIES, ERRORS, OR OMISSIONS THAT MAY APPEAR IN THIS INFORMATION. AMD SPECIFICALLY DISCLAIMS ANY IMPLIED WARRANTIES OF NON-INFRINGEMENT, MERCHANTABILITY, OR FITNESS FOR ANY PARTICULAR PURPOSE. IN NO EVENT WILL AMD BE LIABLE TO ANY PERSON FOR ANY RELIANCE, DIRECT, INDIRECT, SPECIAL, OR OTHER CONSEQUENTIAL DAMAGES ARISING FROM THE USE OF ANY INFORMATION CONTAINED HEREIN, EVEN IF AMD IS EXPRESSLY ADVISED OF THE POSSIBILITY OF SUCH DAMAGES. AMD, the AMD Arrow logo, [insert all other AMD trademarks used in the material here per AMD Trademarks] and combinations thereof are trademarks of Advanced Micro Devices, Inc. Other product names used in this publication are for identification purposes only and may be trademarks of their respective companies. [Insert any third party trademark attribution here per AMD’s Third Party Trademark List.]

Third-party content is licensed to you directly by the third party that owns the content and is not licensed to you by AMD. ALL LINKED THIRD-PARTY CONTENT IS PROVIDED “AS IS” WITHOUT A WARRANTY OF ANY KIND. USE OF SUCH THIRD-PARTY CONTENT IS DONE AT YOUR SOLE DISCRETION AND UNDER NO CIRCUMSTANCES WILL AMD BE LIABLE TO YOU FOR ANY THIRD-PARTY CONTENT. YOU ASSUME ALL RISK AND ARE SOLELY RESPONSIBLE FOR ANY DAMAGES THAT MAY ARISE FROM YOUR USE OF THIRD-PARTY CONTENT.

© 2024 Advanced Micro Devices, Inc. All rights reserved.

GitHub Partners with Infosys to Launch Centre of Excellence

GitHub Partners with Infosys to Launch Center of Excellence

In a significant move towards accelerating digital transformation in India, GitHub has partnered with Infosys to launch the first GitHub Center of Excellence in Bangalore. This initiative aims to leverage AI and advanced software solutions to drive global economic growth.

By integrating GitHub Copilot across Infosys’ developer teams and extending its capabilities to their clients, this collaboration promises to enhance the speed and efficiency of software production worldwide. The partnership represents a generational opportunity for Global Systems Integrators (GSIs) to spearhead advancements in the AI and software sectors.

Thomas Dohmke, CEO of GitHub, posted on LinkedIn, saying, “A new day has begun for the world’s GSI’s. The Age of Copilot is here.”

The launch event, attended by Infosys executives Rafee Tarafdar, CTO of Infosys, and Bali (Balakrishna) D., executive VP of Infosys, showcased the potential of this collaboration to deliver new business value and innovation in the global software economy.

GitHub has been bullish on India to empower the developers in the country. On Dohmke’s visit to India, GitHub has also posted a video with Infosys highlighting how the IT giant is helping developers across India, and the world.

How GitHub and @Infosys—the renowned IT consulting firm—work together to help developers across India and the world 🌏🚀 pic.twitter.com/o4QoZrADcM

— GitHub (@github) June 9, 2024

GitHub’s interest in India is well-founded. The company has recently released its Innovation Graph with data from the fourth quarter of 2023, providing a detailed look at global developer activities over the past four years.

The updated data charts show the growing use of AI among developers in India, marked by a surge in project documentation. This trend is largely fuelled by the adoption of chat-based generative AI tools such as GitHub Copilot Chat and ChatGPT.

The post GitHub Partners with Infosys to Launch Centre of Excellence appeared first on AIM.

Bend It Like Python, Scale It Like CUDA

There has been a lot of buzz around the newest programming language, Bend. Discussion forums have been pitting it against CUDA, the go-to choice for experienced developers. However, with CUDA’s restrictions and worthy alternatives, Bend could be worth the excitement.

Bend is a high-level, massively parallel programming language designed to simplify parallel computing. Unlike traditional low-level languages like CUDA and Metal, Bend offers a Python-like syntax that makes parallel programming more accessible and easy to developers without deep expertise in concurrent programming.

“Bend automatically parallelises code, ensuring that any code that can run in parallel will do so without requiring explicit parallel annotations. As such, while Bend empowers developers with powerful parallel constructs, it maintains a clean and expressive syntax,” Vinay Konanur, VP – emerging technologies, UNext Learning, told AIM.

Why Not Cuda, Then?

One might wonder how it measures up against low-level languages like CUDA. While CUDA is a mature, low-level language that provides precise control over hardware, Bend aims to abstract away the complexities of parallel programming.

Bend is powered by HVM2 (Higher-Order Virtual Machine 2), a successor of HVM, letting you run high-level programming on massively parallel hardware, like GPUs, with near-ideal speedup.

A user mentioned that Bend is nowhere close to the performance of manually optimised CUDA. “It isn’t about peak performance,” he added.

Bend is based on the Rust foundation, which means you can expect top-notch performance through simple Python-like syntax. Konanur also revealed that Bend’s interoperability with Rust libraries and tools provides access to a rich ecosystem.

“Developers can leverage the existing Rust code and gradually transition to Bend,” said Konanur.

Moreover, he believes that the performance of a programming language on a specific GPU can depend on several factors, including the specific GPU, the nature of the task, and how well the task can be parallelized.

“So, even if Bend were to support AMD GPUs in the future, the performance could vary depending on these factors,” Konanur added.

Scalability and Parallelisation

Bend’s official documentation suggests that as long as the code isn’t “helplessly sequential”, Bend will use thousands of threads to run it in parallel. User demos have proved the same.

A recent demo showed a 57x speedup going from 1 CPU thread to 16,000 GPU threads on an NVIDIA RTX 4090. This is a perfect example of how Bend runs on massively parallel hardware like GPUs and provides near-linear speedup based on the number of cores available.

Focusing on parallelisation, Bend is not limited to any specific domain, like array operations. It can scale any concurrent algorithm that can be expressed using recursive data types and folds, from shaders to actor models.

Max Bernstein, a software developer, argues that Bend has different scaling laws compared to the traditional languages. While Bend may be slower than other languages in single-threaded performance, it can scale linearly with the number of cores for parallelisable workloads.

How about Other Programming Languages?

A Reddit user, when asked how different Bend is from CuPy or Numba, answered, “It massively reduces the amount of work you need to do in order to make your general purpose program parallelisable, whereas CuPy and Numba (as far as I know) only parallelise programmes that deal with multidimensional arrays.”

Further, users have also observed that Bend is not focused on giving you peak performance like the manually optimised CUDA code but rather on simplifying code execution by using Python/Haskell-like code on GPUs, which wasn’t possible earlier.

When you compare Bend with Mojo, a programming language that can be executed on GPUs and provides Python-like syntax, Bend focuses more on parallelism across all computations. Mojo is geared more towards traditional AI/ML workloads involving linear algebra.

But unlike Mojo, Bend is completely open-source which means users can take and modify the code as per their convenience. Also, they can contribute to the project as it ensures more transparency.

The post Bend It Like Python, Scale It Like CUDA appeared first on AIM.

Everything Apple will announce at WWDC today: Apple Intelligence, Siri, iOS 18, more

Apple park logo on bags

We're just hours away from finally learning how Apple plans to add a dose of AI to its core products — and where it'll stack up compared to Google, OpenAI, and Microsoft, all of which have already hosted their spring developer conferences.

Also: Apple's new AI features expected for just these iPhone models (for now)

This year's Worldwide Developers Conference, or WWDC, will take place starting Monday, June 10, and wrap up on June 14. The opening day is when the big keynote happens, with CEO Tim Cook and several executives taking the stage to announce the for-consumer updates. The days following are dedicated to developer workshops and private demo sessions.

Naturally, developers and members of the press will be in attendance at Apple Park in Cupertino throughout the week, while everyone else can catch a live stream of the opening keynote, either on Apple's website or YouTube channel.

What is expected at WWDC 2024?

WWDC is typically the event in which Apple takes the wraps off the next major versions of its assorted operating systems. That means we should anticipate demos of iOS 18, iPadOS 18, MacOS 15, WatchOS 11, tvOS 18, and VisionOS 2.0.

The event provides developers with access to experts, along with highlights of new tools and features that will help them create new and/or better apps for the Apple ecosystem.

Also: 10 things I'd like to see in VisionOS 2.0

"We're so excited to connect with developers from around the world for an extraordinary week of technology and community at WWDC24," Susan Prescott, Apple's VP of Worldwide Developer Relations, said in a news release. "WWDC is all about sharing new ideas and providing our amazing developers with innovative tools and resources to help them make something even more wonderful."

1. You'll be hearing AI (or Apple Intelligence) a lot

This year's WWDC promises something extra, namely a spotlight on Apple's endeavors into AI. With companies such as OpenAI, Microsoft, and Google already infusing their products with generative AI, Apple is clearly behind in the race. Even if consumers aren't longing for AI enhancements to all their usual apps and services, investors are anxiously waiting to see what the company can pull off in this new era of technology.

To catch up, Apple reportedly has been working on its own in-house AI tech to add to the next-generation iPhone and other products. On tap at WWDC might be AI-based assistance for services like Apple Music and a major and much-needed overhaul for Siri. Such advances will reportedly be cataloged under the branding "Apple Intelligence," the company's wordplay for AI.

Also: What is 'Apple Intelligence': How it works with on-device and cloud-based AI

Apple Intelligence features, unlike the flashy image and video generation tools typically associated with AI, are more subtle and embedded into daily apps and use cases. For example, Notes, Email, and Messages are on the list to receive a new summarization feature that recaps bodies of text. The Voice Memos app will also support transcription and summarization. Such features will require opt-in, meaning users must agree to use them before they work on background.

Apple has also allegedly been seeking a partner for outside help, possibly teaming up with OpenAI to bring its chatbot expertise to iOS and Google to bring Gemini-powered AI features. Just a few months ago, the company purchased a Canadian startup firm called DarwinAI, which has designed ways to make AI systems smaller and more efficient.

More recently, rumors have suggested that some new AI features will include more intelligent and helpful searches in Safari, AI-generated emojis based on conversations in Messages, and an AI-powered photo editing app similar to Google's Magic Eraser. It's worth noting that such features are believed to only function on the more recent Apple products, including the iPhone 15 Pro with its A17 Pro chip and M-series iPads and MacBooks.

2. Don't forget the other acronym: RCS

To the surprise of many, except for the European Commission, Apple announced last year that iPhones would eventually support Rich Communication Services (RCS), a protocol already adopted by Android phones. Adding this technology should alleviate key pain points when messaging between the two operating systems, including the lack of typing indicators, disorientated group chats, and quality loss when sending media files.

Also: DOJ sues Apple: What it could mean for iPhone users and iOS developers

The decision to bring RCS to the iPhone came after mounting pressure from the European Union's Digital Markets Act (DMA), which stressed cross-platform compatibility. While a more recent statement from Google suggested that Apple would integrate RCS later this fall, highlighting the transition at WWDC could potentially help Apple's defense against the DOJ's antitrust lawsuit, filed in March. Regardless of when and how Apple chooses to announce the new feature, it'll be big news for both iOS and Android users.

3. MacOS 15, iPadOS 18, WatchOS 11, VisionOS 2, tvOS 18

Alongside iOS, expect AI feature upgrades across Apple's software portfolio, including the now two-year-old VisionOS. Considering the company's push to reposition the MacBook as the go-to AI PC, Apple will likely carry over some of the new Siri and AI functionalities for iOS introduced earlier in the event to MacOS 15. Likewise, iPadOS 18 is expected to receive an AI makeover that brings improved multitasking capabilities — possibly to Stage Manager — and a new eye-tracking accessibility feature.

As for VisionOS and Apple's constant pursuit of marketing its $3,500 Vision Pro headset, expect subtle, quality-of-life enhancements, including the ability to move apps around in the home screen, more first-party services, and a more flexible user experience in general.

Apple

TCS, Infosys, HCLTech, Tech Mahindra Partner with Yellow.AI for AI Solutions

TCS, Infosys, HCLTech, Tech Mahindra Partner with Yellow.AI for AI Solutions

Yellow.AI has announced partnerships with major Indian IT firms including Tata Consultancy Services (TCS), Infosys, HCLTech, and Tech Mahindra. These collaborations aim to leverage Yellow.AI’s platform for enhancing HR and customer service automation solutions.

Rashid Khan, co-founder and Chief Product Officer of Yellow.AI, highlighted the strategic importance of these partnerships, stating, “We’ve been working with a lot of global system integrators to sell to large enterprises across the globe,” though he did not specify when these deals were finalised.

These partnerships are part of a growing trend among IT companies to integrate generative AI services for both external clients and internal operations. Yellow.AI’s platform is set to improve HR automation and customer service across various sectors worldwide. “For anything related to AI, they want to start using the Yellow platform, especially for customer service employee automation,” Khan added.

Recently, Khan also said that the company is working on projects like the Komodo 7P model, LLM trained on 8.3 billion tokens on Amazon Bedrock.

Yellow.AI’s platform is built on AI and machine learning technologies, primarily hosted on Amazon Web Services (AWS). The company uses AWS products like SageMaker and Bedrock for machine learning workflows and model hosting.

Yellow.AI also partners with local boutique firms to enhance customer experience strategies using its platform. “With boutique firms, the focus is on customer experience use cases. They help businesses formulate their strategy on customer communication,” Khan said.

The post TCS, Infosys, HCLTech, Tech Mahindra Partner with Yellow.AI for AI Solutions appeared first on AIM.

The Missing Link for Indian Language Chatbots: Indic Data 

The Missing Link for Indian Language Chatbots: Indic Data

In recent times, there has been a noticeable upswing in the efforts to build Indic language models. And even though some of these models are adequate for various tasks, their adoption remains abysmally low compared to their ‘superior’ English counterparts. A huge challenge here is the availability of Indic languages datasets.

In a conversation with AIM, Raj Dabre, a prominent researcher at NICT in Kyoto, adjunct faculty at IIT Madras and a visiting professor at IIT Bombay, discussed the complexities of developing chatbots for Indian languages.

“These models [GPT-3] have seen close to tens of trillions of tokens or words in English. Unless you have seen the entirety of the web, or more or less all of it, none of these models will be able to actually solve the generative AI problem for that [Indian] language,” said Dabre.

The crux of the issue lies in the sheer lack of digitised data in Indian languages. Since English holds a major grip over the internet, the digitised content available for Indian languages remains vastly insufficient.

Bridging the Gap with RomanSetu

Dabre rued that chatbots for Indian languages are still a dream. “You will see a lot of people claiming that they can make a chatbot or LLM for Indian languages, but 99% of those things are transient. They are not going to be too useful in production, because nobody has solved the data problem yet,” said Dabre.

He explained that unless a monolingual dataset is created in Indian languages, which is at parity with the scale of English datasets, we won’t be able to build chatbots that answer in Indic languages without faltering in some way. “However, there are other strategies to transfer the capabilities of English to Indian languages. If someone figured that out, the data problem might be half solved,” said Dabre.

To tackle the issue, Dabre, with researchers from AI4Bharat, IIITDM Kancheepuram, A*STAR Singapore, Flipkart, Microsoft India, and IIT Madras, introduced the RomanSetu paper, which explains a technique that unlocks multilingual capabilities of LLMs via Romanisation.

If you type something in Hindi but in the Roman script, current AI models like Llama and others are able to process it to some degree. That is what Dabre and his team are working on—to train models in Romanised versions of Indic data, leverage the knowledge in the English language, and transfer it to Indic languages.

The team found out through the RomanSetu paper that this approach actually works better than training models on native scripts like Devanagari. “It is like a shortcut,” said Dabre. “We cannot properly pursue the goal of building the next-big LLM for Indic languages unless we solve the data problem.”

Additionally, Dabre is currently working on speech translation models, which have a huge demand in India. He is also one of the creators of IndicBART and IndicTrans2 models at AI4Bharat, founded by his seniors at IIT Bombay.

The team created the IndicNLG Benchmark around the time GPT-3 was launched. But there was not much conversation around Indic language generation at that time. And now that ChatGPT is here, everyone is into building chatbots.

Dabre’s journey with NLP began over a decade ago at IIT Bombay under the guidance of Pushpak Bhattacharya, the former president of the Association of Computational Linguistics and a leading figure in the field of Indic NLP.

He later did his PhD at Kyoto University, under the guidance of Sadao Kurohashi, the director of the National Institute of Informatics, Japan, and a leading figure in Japanese NLP.

Training Big Indic Models Can Be a Waste of Compute

Giving the example of Sangraha dataset by AI4Bharat, which has 251 billion tokens of data in 22 languages, and citing Microsoft’s Phi models, Dabre said that given the scale of data, it is more appropriate for India to build a 1 billion parameter model instead of a larger one.

“A 1 billion parameter model might just do a decent job,” he added, saying that there is not enough data to train such a big model, and called it an injudicious use of compute. However, once the data scales improve, models should also scale.

Another paper by Dabre is assisting researchers to train models with synthetic data. The paper, Do Not Worry if You Do Not Have Data, highlights that translating English documents into Indian languages causes no harm and can roughly have the same amount of knowledge and performance. “You can get by, but it is not an ideal solution; the data needs to be cleaned,” said Dabre.

He concluded that unless these models have an Indian context, they can’t work very well with Indian languages.

The post The Missing Link for Indian Language Chatbots: Indic Data appeared first on AIM.

Top 7 Simple Courses to Build AI Agents Using LangGraph

Top 7 Simple Courses to Build AI Agents Using LangGraph

Andrew Ng, the founder of DeepLearning.AI, recently launched a new course on building single and multi-agent LLM applications using LangGraph.

LangGraph is a framework within the LangChain ecosystem designed explicitly to build AI agents using a graph-based approach. It allows developers to structure complex interactions and workflows visually, making them easier to manage and understand.

The modular design and reusable components can reduce the development time by up to 30%. The tool facilitates stateful interactions, maintains context across sessions, and supports the integration of external APIs and tools, improving the capabilities of the AI agents.

It also allows multi-agent collaboration and provides features like user confirmations and conditional interrupts, enabling a more controlled user experience.

Here are a few simple and user-friendly tutorials to help you build AI agents.

AI Agents in LangGraph

DeepLearning AI’s newly launched course ‘AI Agents in LangGraph’ will help you learn how to use LangGraph to create controllable agents and integrate agentic search to enhance an agent’s knowledge with query-focused answers in predictable formats.

The course will be taught by Harrison Chase, the CEO of LangChain; and Rotem Weiss, the CEO of Tavily. The participants will gain insights into implementing agentic memory for enhanced reasoning and debugging, and see how human-in-the-loop input can guide agents at key junctures.

In this course, one would learn how to build an agent from scratch and then reconstruct it using LangGraph to understand the framework. Finally, they will be able to develop an essay-writing agent that incorporates all the learnings from the session.

New AI Agentic course! Learn to use LangGraph to build single and multi-agent LLM applications in AI Agents in LangGraph. This short course, taught by LangChain @LangChainAI founder Harrison Chase @hwchase17 and @tavilyai founder @weiss_rotem, shows how to integrate agentic… pic.twitter.com/NhPT4GAtRq

— Andrew Ng (@AndrewYNg) June 5, 2024

LangGraph: Build Your Own AI Financial Agent Application (Beginners)

This tutorial on building a financial agent application with LangGraph is ideal for beginners who wish to harness AI for finance. It will walk them through the steps of creating tools, assigning them to an agent, and managing their interactions through a graph.

Additionally, they will be able to integrate Gradio to create an interactive user interface. This will help them access real-time stock prices, recent financial news, detailed reports, and historical data on companies, all within one application.

LangGraph: Build Your Own AI Financial Agent Application (Beginners Guide)
🚀 AI Financial Agent App
📊 Stock Price Analysis
📰 Latest News Fetching
📈 Historical Stock Price Data Tracking
🖥 Gradio UI Integration
Subscribe: https://t.co/RTY3pSVFGl
YT: https://t.co/S7VYiRNTfc… pic.twitter.com/GlhM6hTVTx

— Mervin Praison (@MervinPraison) March 19, 2024

LangGraph 101

This video session provides an in-depth knowledge of LangGraph, from basic introduction to building graphs in the framework to more complex LangGraph agents. You will learn how to build agents with LangGraph and OpenAI.

Hands-on with LangGraph Agent Workflows

This video provides a comprehensive tutorial on building a LangChain coding agent using LangGraph. It starts by explaining the basics of manually managing a conversation with OpenAI + Tools and then explains how to handle the same workflow with a custom agent built with LangGraph.

The tutorial demonstrates how to integrate these tools into an agent workflow, coordinating them through a graph structure.

Build Computing Olympiad Agents with LangGraph

This video session teaches you how to create Olympiad programming agents using LangGraph. By the end of the tutorial, you will have a solid understanding of how to build agents in LangGraph, leveraging advanced techniques such as reflection, retrieval, and human-in-the-loop interaction.

In this tutorial, we create Olympiad programming agents using LangGraph

🤖🏆LangGraph: Can Language Models Solve Olympiad Programming? 🤖🏆
Last week, Princeton researchers released the USACO benchmark dataset and showed that a zero-shot GPT-4 agent only passes 8.7% of the questions.
We've implemented this paper in LangGraph and created a tutorial… pic.twitter.com/vKZ4nPcov6

— LangChain (@LangChainAI) April 25, 2024

Creating an AI Agent with LangGraph Llama 3 & Groq

This tutorial focuses on integrating custom tools into your LangGraph agent to extend its capabilities. You will learn how to use the Llama 3 model to enhance the performance and intelligence of your agent, and utilise Groq’s powerful hardware for increased computational efficiency.

It will help you design and implement workflows for your agent, leveraging LangGraph’s graph-based structure to manage complex interactions.

🤖Creating an AI Agent with LangGraph, Llama 3, & Groq
Great 30min YouTube walkthrough by @Sam_Witteveen on converting a LangChain AgentExecutor to a LangGraph agent – and making it a bit more advanced in the process
Video: https://t.co/1gmGuigU1I
Code: https://t.co/3bHVlPnK1g pic.twitter.com/DOLJWkW9qE

— LangChain (@LangChainAI) May 18, 2024

Build a Customer Support Bot Using LangGraph

This session will help you build a travel assistant chatbot using LangGraph. You will be introduced to various reusable techniques applicable to developing any customer support chatbot or AI system that utilises tools, supports multiple user journeys, or requires a high degree of control.

The post Top 7 Simple Courses to Build AI Agents Using LangGraph appeared first on AIM.

smallest.ai Launches AWAAZ, a Multi-Lingual, Multi-Accent Text-to-Speech Model in Indian Languages

smallest.ai Launches AWAAZ, a Multi-Lingual, Multi-Accent Text-to-Speech Model in Indian Languages

smallest.ai has unveiled the beta version of AWAAZ, a text-to-speech (TTS) model designed for Indian languages. This model boasts several advanced features including state-of-the-art Mean Opinion Score (MOS) in Hindi and Indian English, and the ability to speak in over 10 accents.

AWAAZ offers single-shot voice cloning from just a 5-second audio clip and provides a low 200ms streaming latency. In an enticing introductory offer, it is priced at Rs. 999 for 500,000 characters, which it claims is ten times cheaper than its competitors.

smallest.ai developed AWAAZ in response to the lack of high-quality and cost-effective TTS models for Indian languages. The team noted that existing models either suffer from poor quality or are prohibitively expensive, especially for scaling. AWAAZ addresses these issues by utilising high-quality, multi-language, multi-accent datasets, focusing initially on India and South Asia.

A demo showcasing AWAAZ’s capabilities is available, and smallest.ai is seeking feedback from users. Key features of AWAAZ include ~200ms latency, dedicated throughput, enterprise security, custom compliance, and enterprise discounts.

With a headquarters in San Francisco, smallest.ai was founded in 2023 by Sudarshan Kamath and Akshat Mandloi and came out of stealth mode just recently with the aim of building voice-based generative AI models.

The post smallest.ai Launches AWAAZ, a Multi-Lingual, Multi-Accent Text-to-Speech Model in Indian Languages appeared first on AIM.