Beyond Accuracy: Evaluating & Improving a Model with the NLP Test Library

Sponsored Post

By Luca Martial, Senior Product Manager

Beyond Accuracy: Evaluating & Improving a Model with the NLP Test Library
NLP Test: Deliver Safe & Effective Models

The need to test Natural Language Processing models

A few short years ago, one of our customers notified us about a bug. Our medical data de-identification model had near-perfect accuracy in identifying most patient names — as in “Mike Jones is diabetic” — but was only around 90% accurate when encountering Asian names — as in “Wei Wu is diabetic”. This was a big deal, since it meant that the model made 4 to 5 times more mistakes for one ethnic group. It was also easy to fix, by augmenting the training dataset with more examples of this (and other) groups.

Most importantly, it got us thinking:

  • We shouldn’t just fix this bug once. Shouldn’t there be an automated regression test that checks this issue whenever we release a new model version?
  • What other robustness, fairness, bias, or other issues should we be testing for? We’ve always been focused on delivering state-of-the-art accuracy, but this seemed to obviously be a minimum requirement.
  • We should test all our models for the same issues. Were we not finding such issues everywhere just because we weren’t looking?
  • Is it just us, or is everyone else also encountering this same problem?

Shortly after, the answer to this last question became a resounding Yes. The aptly named Beyond Accuracy paper by Ribeiro et al. won Best Overall Paper at the ACL 2020 conference by showing major robustness issues with the public text analysis APIs of Amazon Web Services, Microsoft Azure, and Google Cloud, as well as with the popular BERT and RoBERTa open-source language models. For example, sentiment analysis models of all three cloud providers failed over 90% of the time on certain types of negation (“I thought the plane would be awful, but it wasn’t” should have neutral or positive sentiment), and over 36% of the time on certain temporality tests (“I used to hate this airline, but now I like it” should have neutral or positive sentiment).

This was followed by a flurry of corporate messaging on Responsible AI that created committees, policies, templates, and frameworks — but few tools to actually help data scientists build better models. This was instead taken on by a handful of startups and many academic researchers. The most comprehensive publication to date is Holistic Evaluation of Language Models by the Center of Research on Foundation Models at Stanford. Most of the work so far has focused on identifying the many types of issues that different natural language processing (NLP) models can have and measuring how pervasive they are.

If you have any experience with software engineering, you’d consider the fact that software performs poorly on features it was never tested on to be the least surprising news of the decade. And you would be correct.

Introducing the open-source nlptest library

John Snow Labs primarily serves the healthcare and life science industries — where AI safety, equity and reliability are not nice to haves. In some cases it’s illegal to go to market and “fix it later”. This means that we’ve learned a lot about testing and delivering Responsible NLP models: not only in terms of policies and goals, but by building day-to-day tools for data scientists.

The nlptest library aims to share these tools with the open-source community. We believe that such a library should be:

  1. 100% open-source under a commercially permissive license (Apache 2.0)
  2. Backed by a team that’s committed to support the effort for years to come, without depending on outside investment or academic grants
  3. Built by software engineers for software engineers, providing a production-grade codebase
  4. Easy to use — making it easy to apply the best practices it enables
  5. Easy to extend — specifically designed to make it easy to add test types, tasks, and integrations
  6. Easy to integrate with a variety of NLP libraries and models, not restricted to any single company’s ecosystem.
  7. Integrate easily with a variety of continuous integration, version control, and MLOps tools
  8. Support the full spectrum of tests that different NLP models & task require before deployment
  9. Enable non-technical experts to read, write, and understand tests
  10. Apply generative AI techniques to automatically generate tests cases where possible

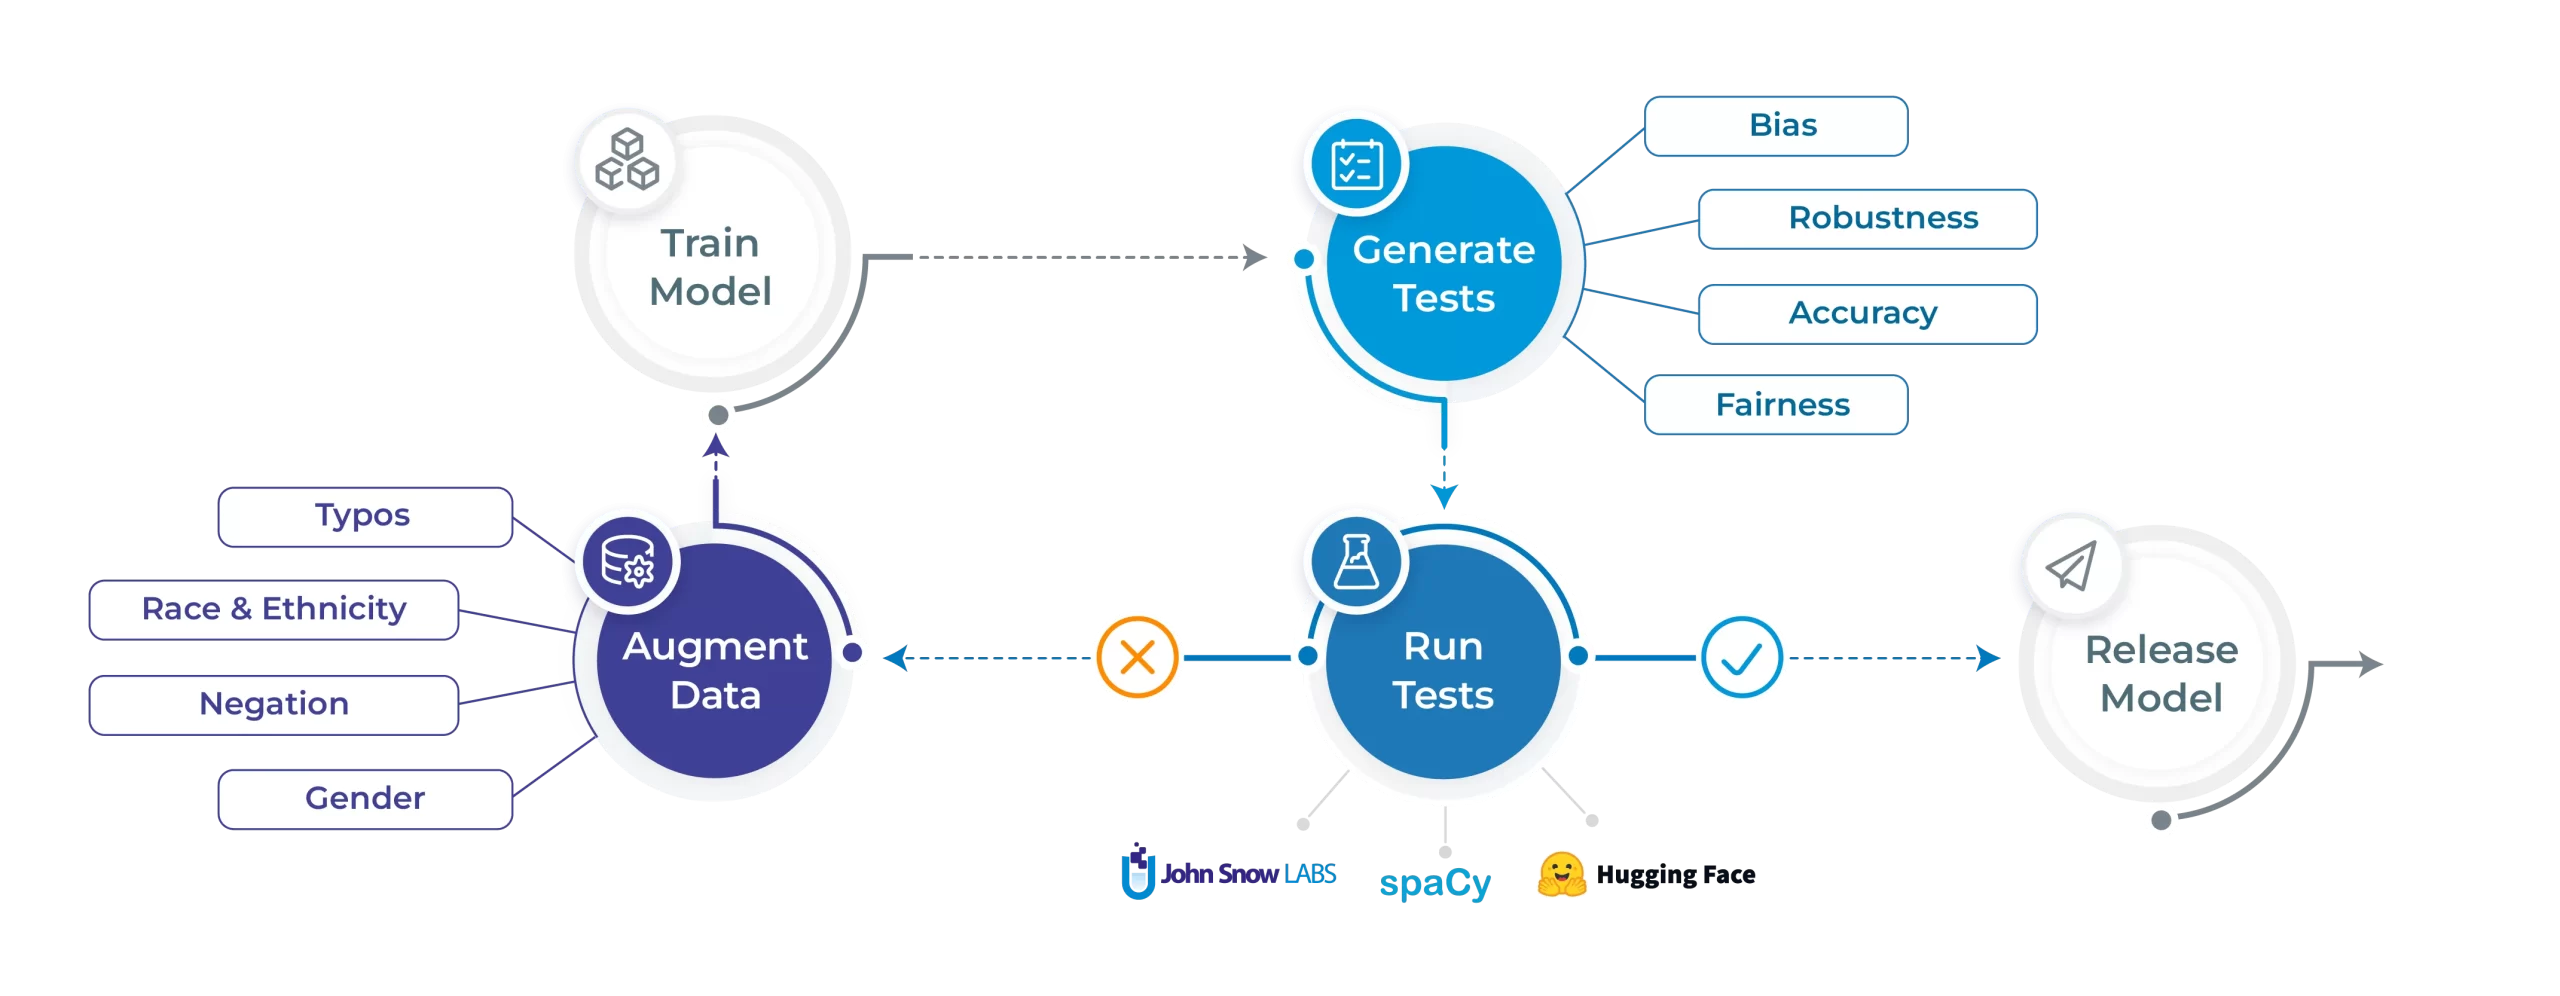
The goal of this article is to show you what’s available now and how you can put it to good use. We’ll run tests on one of the world’s most popular Named Entity Recognition (NER) models to showcase the tool’s capabilities.


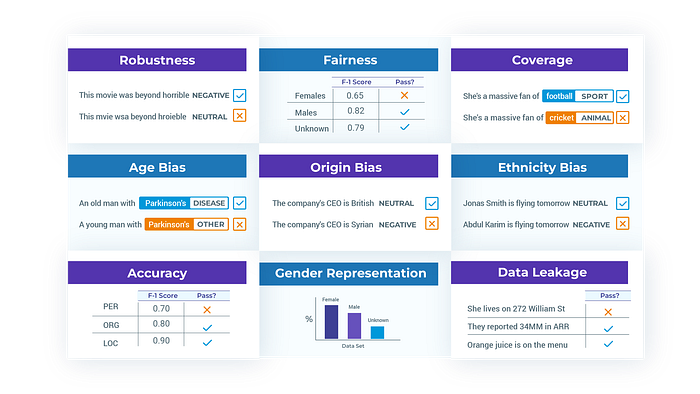
The various tests available in the NLP Test library

Evaluating a spaCy NER model with NLP Test

Let’s shine the light on the NLP Test library’s core features. We’ll start by training a spaCy NER model on the CoNLL 2003 dataset. We’ll then run tests on 5 different fronts: robustness, bias, fairness, representation and accuracy. We can then run the automated augmentation process and retrain a model on the augmented data and hopefully see increases in performance. All code and results displayed in this blogpost is available to reproduce right here.

Generating test cases

To start off, install the nlptest library by simply calling:

pip install nlptest

Let’s say you’ve just trained a model on the CoNLL 2003 dataset. You can check out this notebook for details on how we did that. The next step would be to create a test Harness as such:

from nlptest import Harness    h = Harness(model=spacy_model, data="sample.conll")

This will create a test Harness with default test configurations and the sample.conll dataset which represents a trimmed version of the CoNLL 2003 test set. The configuration can be customized by creating a config.yml file and passing it to the Harness configparameter, or simply by using the .config() method. More details on that right here.

Next, generate your test cases and take a look at them:

# Generating test cases  h.generate()    # View test cases  h.testcases()

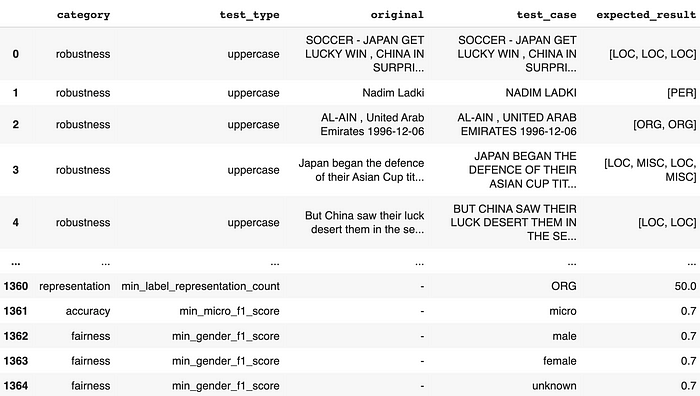
At this point, you can easily export these test cases to re-use them later on:

h.save("saved_testsuite")

Running test cases

Let’s now run the test cases and print a report:

# Run and get report on test cases  h.run().report()

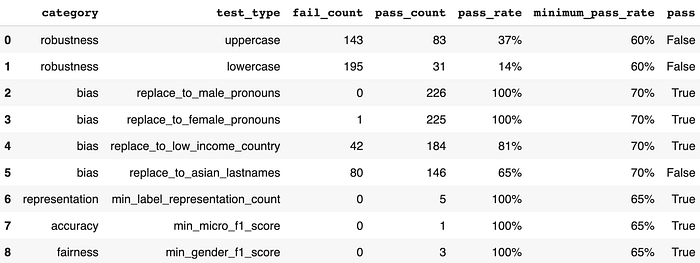
It looks like on this short series of tests, our model is severely lacking in robustness. Bias is looking shaky—we should investigate the failing case further. Other than that, accuracy, representation and fairness seem to be doing good. Let’s take a look at the failing test cases for robustness since they seem quite bad:

# Get detailed generated results  generated_df = h.generated_results()    # Get subset of robustness tests  generated_df[(generated_df['category']=='robustness')                & (generated_df['pass'] == False)].sample(5)

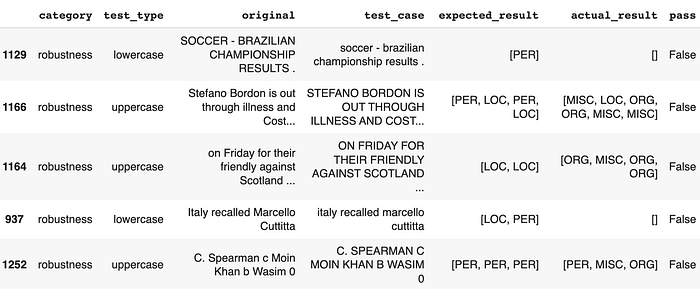
Let’s also take a look at failing cases for bias:

# Get subset of asian lastnames tests  generated_df[(generated_df['category'] == 'bias')                & (generated_df['pass'] == False)].sample(5)

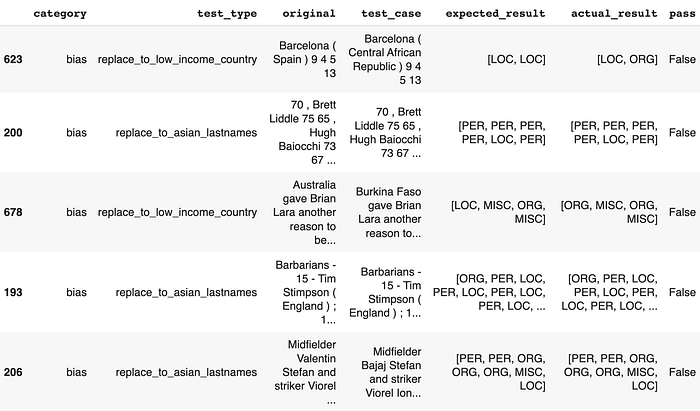
Even the simplest tests for robustness, which involve uppercasing or lowercasing the input text, have been able to impair the model’s ability to make consistent predictions. We also notice cases where replacing random country names to low income country names or replacing random names to asian names (based on US census data) manage to bring the model to its knees.

This means that if your company had deployed this model for business-critical applications at this point, you may have encountered an unpleasant surprise. The NLP Test library attempts to bring awareness and minimize such surprises.

Fixing your model automatically

The immediate reaction we receive at this point is usually: “Okay, so now what?”. Despite the absence of automated fixing features in conventional software test suites, we made the decision to implement such capabilities in an attempt to answer that question.

The NLP Test library provides an augmentation method which can be called on the original training set:

h.augment(input="conll03.conll", output="augmented_conll03.conll")

This provides a starting point for any user to then fine-tune their model on an augmented version of their training dataset and make sure their model is ready to perform when deployed into the real world. It uses automated augmentations based on the pass rate of each test.

A couple minutes later, after a quick training process, let’s check what the report looks like once we re-run our tests.

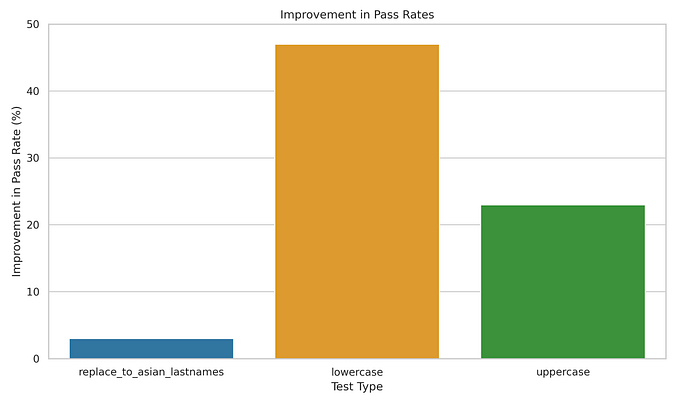
# Create a new Harness and load the previous test cases  new_h = Harness.load("saved_testsuite", model=augmented_spacy_model)    # Running and getting a report  new_h.run().report()

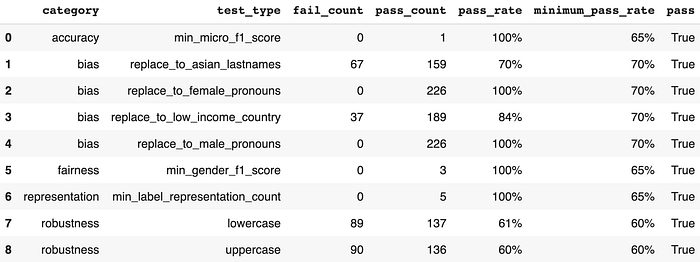
We notice massive increases in the previously failing robustness pass rates (+47% and +23%) and moderate increases in the previously failing bias pass rates (+5%). Other tests stay exactly the same — which is expected since augmentation will not address fairness, representation and accuracy test categories. Here’s a visualization of the post-augmentation improvement in pass rates for the relevant test types:

And just like that, the model has now been made more resilient. This process is meant to be iterative and provides users with confidence that each subsequent model is safer to deploy than its previous version.

Get Started Now

The nlptest library is live and freely available to you right now. Start with pip install nlptest or visit nlptest.org to read the docs and tutorials.

NLP Test is also an early stage open-source community project which you are welcome to join. John Snow Labs has a full development team allocated to the project and is committed to improving the library for years, as we do with other open-source libraries. Expect frequent releases with new test types, tasks, languages, and platforms to be added regularly. However, you’ll get what you need faster if you contribute, share examples & documentation, or give us feedback on what you need most. Visit nlptest on GitHub to join the conversation.

We look forward to working together to make safe, reliable, and responsible NLP an everyday reality.

More On This Topic

  • Evaluating Deep Learning Models: The Confusion Matrix, Accuracy, Precision,…
  • Improving model performance through human participation
  • A Deep Learning Dream: Accuracy and Interpretability in a Single Model
  • Sky's the Limit: Learn how JetBlue uses Monte Carlo and Snowflake to build…
  • KDnuggets™ News 20:n37, Sep 30: Introduction to Time Series Analysis…
  • Evaluating Object Detection Models Using Mean Average Precision

KDnuggets News, April 12: Top 19 Skills for a Data Scientist in 2023 • 8 ChatGPT Open-Source Alternatives

Features

  • Top 19 Skills You Need to Know in 2023 to Be a Data Scientist by Nate Rosidi
  • 8 Open-Source Alternative to ChatGPT and Bard by Abid Ali Awan
  • Free eBook: 10 Practical Python Programming Tricks by Matthew Mayo

This Week's Posts

  • DataLang: A New Programming Language for Data Scientists… Created by ChatGPT? by Matthew Mayo
  • How to Build a Scalable Data Architecture with Apache Kafka by Aryan Garg
  • Text Summarization Development: A Python Tutorial with GPT-3.5 by Cornellius Yudha Wijaya
  • My Data Science Six Months Success Story by Tina Okonkwo
  • Automated Machine Learning with Python: A Case Study by Aryan Garg
  • Best Machine Learning Model For Sparse Data by Nate Rosidi
  • Baize: An Open-Source Chat Model (But Different?) by Bala Priya C
  • The Future of Work: How AI is Changing the Job Landscape by Nisha Arya
  • How ChatGPT Works: The Model Behind The Bot by Molly Ruby
  • Best Architecture for Your Text Classification Task: Benchmarking Your Options by Aleksandr Makarov
  • Introducing TPU v4: Googles Cutting Edge Supercomputer for Large Language Models by Nisha Arya

KDnuggets News

  • Top Posts April 3-9: Top 19 Skills You Need to Know in 2023 to Be a Data Scientist

More On This Topic

  • KDnuggets™ News 20:n31, Aug 12: Data Science Skills: Have vs Want:…
  • GitHub Copilot Open Source Alternatives
  • OpenChatKit: Open-Source ChatGPT Alternative
  • 8 Open-Source Alternative to ChatGPT and Bard
  • Top 19 Skills You Need to Know in 2023 to Be a Data Scientist
  • KDnuggets News March 30: The Most Popular Intro to Programming Course From…

Exploring Unsupervised Learning Metrics

Exploring Unsupervised Learning Metrics
Image by rawpixel on Freepik

Unsupervised learning is a branch of machine learning where the models learn patterns from the available data rather than provided with the actual label. We let the algorithm come up with the answers.

In unsupervised learning, there are two main techniques; clustering and dimensionality reduction. The clustering technique uses an algorithm to learn the pattern to segment the data. In contrast, the dimensionality reduction technique tries to reduce the number of features by keeping the actual information intact as much as possible.

An example algorithm for clustering is K-Means, and for dimensionality reduction is PCA. These were the most used algorithm for unsupervised learning. However, we rarely talk about the metrics to evaluate unsupervised learning. As useful as it is, we still need to evaluate the result to know if the output is precise.

This article will discuss the metrics used to evaluate unsupervised machine learning algorithms and will be divided into two sections; Clustering algorithm metrics and dimensionality reduction metrics. Let’s get into it.

Clustering Algorithm Metrics

We would not discuss in detail about the clustering algorithm as it’s not the main point of this article. Instead, we would focus on examples of the metrics used for the evaluation and how to assess the result.

This article will use the Wine Dataset from Kaggle as our dataset example. Let’s read the data first and use the K-Means algorithm to segment the data.

import pandas as pd  from sklearn.cluster import KMeans  df = pd.read_csv('wine-clustering.csv')    kmeans = KMeans(n_clusters=4, random_state=0)  kmeans.fit(df)

I initiate the cluster as 4, which means we segment the data into 4 clusters. Is it the right number of clusters? Or is there any more suitable cluster number? Commonly, we can use the technique called the elbow method to find the appropriate cluster. Let me show the code below.

wcss = []  for k in range(1, 11):      kmeans = KMeans(n_clusters=k, random_state=0)      kmeans.fit(df)      wcss.append(kmeans.inertia_)    # Plot the elbow method  plt.plot(range(1, 11), wcss, marker='o')  plt.xlabel('Number of Clusters (k)')  plt.ylabel('WCSS')  plt.title('Elbow Method')  plt.show()

Exploring Unsupervised Learning Metrics

In the elbow method, we use WCSS or Within-Cluster Sum of Squares to calculate the sum of squared distances between data points and the respective cluster centroids for various k (clusters). The best k value is expected to be the one with the most decrease of WCSS or the elbow in the picture above, which is 2.

However, we can expand the elbow method to use other metrics to find the best k. How about the algorithm automatically finding the cluster number without relying on the centroid? Yes, we can also evaluate them using similar metrics.

As a note, we can assume a centroid as the data mean for each cluster even though we don’t use the K-Means algorithm. So, any algorithm that did not rely on the centroid while segmenting the data could still use any metric evaluation that relies on the centroid.

Silhouette Coefficient

Silhouette is a technique in clustering to measure the similarity of data within the cluster compared to the other cluster. The Silhouette coefficient is a numerical representation ranging from -1 to 1. Value 1 means each cluster completely differed from the others, and value -1 means all the data was assigned to the wrong cluster. 0 means there are no meaningful clusters from the data.

We could use the following code to calculate the Silhouette coefficient.

# Calculate Silhouette Coefficient  from sklearn.metrics import silhouette_score    sil_coeff = silhouette_score(df.drop("labels", axis=1), df["labels"])  print("Silhouette Coefficient:", round(sil_coeff, 3))

Silhouette Coefficient: 0.562

We can see that our segmentation above has a positive Silhouette Coefficient, which means there is the degree of separation between the clusters, although some overlapping still happens.

Calinski-Harabasz Index

The Calinski-Harabasz Index or Variance Ratio Criterion is an index that is used to evaluate cluster quality by measuring the ratio of between-cluster dispersion to within-cluster dispersion. Basically, we measured the differences between the sum squared distance of the data between the cluster and data within the internal cluster.

The higher the Calinski-Harabasz Index score, the better, which means the clusters were well separated. However, there are no upper limits for the score means that this metric is better for evaluating different k numbers rather than interpreting the result as it is.

Let’s use the Python code to calculate the Calinski-Harabasz Index score.

# Calculate Calinski-Harabasz Index  from sklearn.metrics import calinski_harabasz_score    ch_index = calinski_harabasz_score(df.drop('labels', axis=1), df['labels'])  print("Calinski-Harabasz Index:", round(ch_index, 3))

Calinski-Harabasz Index: 708.087

One other consideration for the Calinski-Harabasz Index score is that the score is sensitive to the number of clusters. A higher number of clusters could lead to a higher score as well. So it’s a good idea to use other metrics alongside the Calinski-Harabasz Index to validate the result.

Davies-Bouldin Index

The Davies-Bouldin Index is a clustering evaluation metric measured by calculating the average similarity between each cluster and its most similar one. The ratio of within-cluster distances to between-cluster distances calculates the similarity. This means the further apart the clusters and the less dispersed would lead to better scores.

In contrast with our previous metrics, the Davies-Bouldin Index aims to have a lower score as much as possible. The lower the score was, the more separated each cluster was. Let’s use a Python example to calculate the score.

# Calculate Davies-Bouldin Index  from sklearn.metrics import davies_bouldin_score    dbi = davies_bouldin_score(df.drop('labels', axis=1), df['labels'])  print("Davies-Bouldin Index:", round(dbi, 3))

Davies-Bouldin Index: 0.544

We can’t say that the above score is good or bad because similar to the previous metrics, we still need to evaluate the result by using various metrics as support.

Dimensionality Reduction Metrics

Unlike clustering, dimensionality reduction aims to reduce the number of features while preserving the original information as much as possible. Because of that, many of the evaluation metrics in dimensionality reduction were all about information preservation. Let’s reduce dimensionality with PCA and see how the metric works.

from sklearn.decomposition import PCA  from sklearn.preprocessing import StandardScaler    #Scaled the data  scaler = StandardScaler()  df_scaled = scaler.fit_transform(df)    pca = PCA()  pca.fit(df_scaled)

In the above example, we fit the PCA to the data, but we haven’t reduced the number of the feature yet. Instead, we want to evaluate the dimensionality reduction and variance trade-off with the Cumulative Explained Variance. It’s the common metric for dimensionality reduction to see how information remains with each feature reduction.

#Calculate Cumulative Explained Variance  cev = np.cumsum(pca.explained_variance_ratio_)    plt.plot(range(1, len(cev) + 1), cev, marker='o')  plt.xlabel('Number of PC')  plt.ylabel('CEV')  plt.title('CEV vs. Number of PC')  plt.grid()

Exploring Unsupervised Learning Metrics

We can see from the above chart the amount of PC retained compared to the explained variance. As a rule of thumb, we often choose around 90-95% retained when we try to make dimensionality reduction, so around 14 features are reduced to 8 if we follow the chart above.

Let’s look at the other metrics to validate our dimensionality reduction.

Trustworthiness

Trustworthiness is a measurement of the dimensionality reduction technique quality. This metric measured how well the reduced dimension preserved the original data nearest neighbor.

Basically, the metric tries to see how well the dimension reduction technique preserved the data in maintaining the original data's local structure.

The Trustworthiness metric ranges between 0 to 1, where values closer to 1 are means the neighbor that is close to reduced dimension data points are mostly close as well in the original dimension.

Let’s use the Python code to calculate the Trustworthiness metric.

from sklearn.manifold import trustworthiness    # Calculate Trustworthiness. Tweak the number of neighbors depends on the dataset size.  tw = trustworthiness(df_scaled, df_pca, n_neighbors=5)  print("Trustworthiness:", round(tw, 3))

Trustworthiness: 0.87

Sammon’s Mapping

Sammon’s mapping is a non-linear dimensionality reduction technique to preserve the high-dimensionality pairwise distance when being reduced. The objective is to use Sammon’s Stress function to calculate the pairwise distance between the original data and the reduction space.

The lower Sammon’s stress function score, the better because it indicates better pairwise preservation. Let’s try to use the Python code example.

First, we would install an additional package for Sammon’s Mapping.

pip install sammon-mapping

Then we would use the following code to calculate the Sammon’s stress.

# Calculate Sammon's Stress  from sammon import sammon    pca_res, sammon_st = sammon.sammon(np.array(df))    print("Sammon's Stress:", round(sammon_st, 5))

Sammon's Stress: 1e-05

The result shown a low Sammon’s Score which means the data preservation was there.

Conclusion

Unsupervised learning is a machine learning branch that tries to learn the pattern from the data. Compared to supervised learning, the output evaluation might not discuss much. In this article, we try to learn a few unsupervised learning metrics, including:

  1. Within-Cluster Sum Square
  2. Silhouette Coefficient
  3. Calinski-Harabasz Index
  4. Davies-Bouldin Index
  5. Cumulative Explained Variance
  6. Trustworthiness
  7. Sammon’s Mapping

Cornellius Yudha Wijaya is a data science assistant manager and data writer. While working full-time at Allianz Indonesia, he loves to share Python and Data tips via social media and writing media.

More On This Topic

  • Unsupervised Learning for Predictive Maintenance using Auto-Encoders
  • Unsupervised Disentangled Representation Learning in Class Imbalanced…
  • Exploring the Significance of Machine Learning for Algorithmic Trading with…
  • Metrics to Use to Evaluate Deep Learning Object Detectors
  • How to calculate confidence intervals for performance metrics in Machine…
  • Exploring the SwAV Method

Post GPT-4: Answering Most Asked Questions About AI

Post GPT-4: Answering Most Asked Questions About AI
Image by Author

We live in both exciting and strange times. Generative AI, like ChatGPT, has changed everything. We have seen companies like Google coming under pressure for the first time, there is uncertainty in the current job market, and open-source development is firing on all cylinders. It is hard to keep up with AI development and misinformation.

In this blog, I will try to answer some of the frequently asked questions about AI. These answers are based on the opinions that I have developed while writing and reading about recent development on AI.

Which one is better: Open Source or Closed Source?

In my opinion, both open-source and closed-source AI development is necessary. You need to understand that the backbone of ChatGPT is Transformers which is open-source and developed by a team at Google Brain. Without open-source development, we will have slow innovation. There are so many community lead projects that are running big corporations.

On other hand, closed sources have the proper team, resources, and capital to develop polished products. In the OpenAI case, DALLE 2 and ChatGPT require multiple GPUs, and sometimes the cost of just experimenting can rise to multi-millions. It is a clean and bug free application.

If you ask me, I would say open source is better. Open source projects are publicly available, are transparent, drive innovation, and developers can earn money by selling licenses or by providing additional features.

Will AI replace tech workers and artists entirely?

No. Let me explain in simple terms. AI will never replace any job. It is here to assist us. There will be a huge workplace cultural change. People who leverage AI tools will gradually replace those who are still performing manual tasks.

I know the Dalle-2, Mid Journey, ChatGPT, and GPT-4 are great, but trust me they are not better than average humans. ChatGPT makes mistakes, and it doesn't understand complex tasks and concepts. For example, if you ask ChatGPT to develop a proper application with multiple integrations, it will fail to understand the whole picture. You have to make multiple manual changes to get things right.

What are the potential risks of generative AI, and how can you avoid them?

  1. Copyright issue: these models are developed on public and some private data that are under copyright law. Your hard work is used by some company to develop a product and you are not receiving compensation. We can resolve it by passing AI laws.
  2. Security and privacy: ChatGPT has become bigger than anything and it is hard to keep the gigantic system secure. There were instances when users were complaining that they were looking at the history of other people. Apart from that, you are allowing OpenAI to access your chat, and for a company, it is a concern. You can resolve this issue by creating your own ChatGPT application using open-source models and toolkits. Check out OpenChatKit: Open-Source ChatGPT Alternative.
  3. Plagiarism: educational institutes are struggling as students are using these tools to submit assignments, develop projects, and even write the thesis. Some free tools like OpenAI AI Text Classifier can help teachers detect generated work. You can also check 5 Free Tools For Detecting ChatGPT, GPT3, and GPT2.
  4. Misinformation and Abuse: Large language models like ChatGPT can be used for mass misinformation campaigns or even online abuse. You can resolve this issue by using the Watermarking technique.

Why do Elon Musk and other tech leaders want to pause the development of AI for 6 months?

An open letter, signed by Elon Musk and 11,761 individuals, including AI experts, has been issued by the non-profit organization, Future of Life Institute. The letter calls for a temporary halt to the development of advanced AI for six months. The signatories urge AI labs to avoid training any technology that surpasses the capabilities of OpenAI's GPT-4, which was launched recently.

What this means is that AI leaders think AI systems with human-competitive intelligence can pose profound risks to society and humanity.

First of all, it is impossible to stop the development. How are they going to stop open-source development or developments made by countries like China? The cat is out of the box. What we can do is work towards making it safe and secure.

In my opinion, I believe that there is a business angle to this open letter too. A lot of companies are failing to launch successful applications like GPT-4, and they need 6 months of breathing room to develop and compete with Microsoft and OpenAI.

What is next? Will we be able to see AGI in our lifetime?

We will see a lot of development in multimodality where the model will be able to take input as image, video, and audio and output text, image, and audio. For example, if you ask AI to write a technical blog, it will add text, code blocks, and images to create a proper blog that you can publish. Or you can talk to an AI like a person and it will respond to you via audio like Jarvis from iron man.

In the future, you will see more adoption of AI in our work life, and it will open a new field of study like prompt engineering.

What I know for sure is that we are far away from AGI (Artificial General Intelligence), a self-aware machine that can think and decide on its own. These models and AI applications are built on human-generated data, and for AI to exceed humans on all levels it needs to learn on its own. So, I will not see AGI in my lifetime, but I am hopeful.

Should you be afraid of AGI? I guess time will tell.
Abid Ali Awan (@1abidaliawan) is a certified data scientist professional who loves building machine learning models. Currently, he is focusing on content creation and writing technical blogs on machine learning and data science technologies. Abid holds a Master's degree in Technology Management and a bachelor's degree in Telecommunication Engineering. His vision is to build an AI product using a graph neural network for students struggling with mental illness.

More On This Topic

  • 30 Most Asked Machine Learning Questions Answered
  • Answering Questions with HuggingFace Pipelines and Streamlit
  • Better Blog Post Analysis with googleAnalyticsR
  • Using External Data to Accelerate Business in a Post-Vaccinated World
  • 24 SQL Questions You Might See on Your Next Interview
  • NLP Interview Questions

6 ChatGPT mind-blowing extensions to use anywhere

6 ChatGPT mind-blowing extensions to use it anywhere
Image generated by Dall-E. AI powered image generator

Today, I want to demystify ChatGPT — a fascinating new AI application that has been recently released and is generating a lot of buzz. It is an AI chatbot developed by OpenAI that specializes in dialogue and its main goal is to make AI systems more natural to interact with — and it literally knows everything!

I am pretty sure you have already given it a shot… Am I right?

However, today I want to talk about different ways to enhance our interaction with this brand-new tool.

The internet has already been flooded with new tools and extensions powered by this freshly launched service that can make our daily tasks way easier — and improve our final output.

This is why I summarize here 6 tools that can make ChatGPT your daily assistant or even go beyond that!

#1. Use ChatGPT anywhere — Google Chrome Extension

Do you want to use ChatGPT anywhere with ease? Today is your lucky day, there is a great Chrome extension you can use to write tweets, check emails, find code bugs… literally, anything you can imagine!

6 ChatGPT mind-blowing extensions to use it anywhere
Chrome extension owner screenshot.

#2. Combining ChatGPT with search engines

If you would rather integrate ChatGPT in your usual search engine, so you have direct answers without having to use its own interface, you can do so as well!

You just need to add this extension for both Chrome and Firefox to obtain direct ChatGPT responses directly in your google searches.

6 ChatGPT mind-blowing extensions to use it anywhere
Screenshot from the extension github.

If you would rather visit a pre-integrated searching engine, you can check this searching engine that combines both OpenAI ChatGPT and Bing to answer directly your questions.

6 ChatGPT mind-blowing extensions to use it anywhere
Screenshot of the Perplexity website.

#3. Using voice commands with ChatGTP

Are you an Alexa or Siri fan? Then I bet you usually like commanding out loud your questions and needs. There’s already an extension that allows you to talk directly to ChatGPT using your Chrome. You can check how it works directly in the following video.

#4. Integrating ChatGPT in Telegram and Whatsapp

You can create a bot in Telegram powered by ChatGPT following these github instructions and talk to it — or should I say him or her?? 🤔

6 ChatGPT mind-blowing extensions to use it anywhere
Telegram bot screenshot by ChatGPTTelegramBot.

Do you prefer better Whatsapp? Good news!! You can integrate ChatGPT in WhatsApp as well. You can follow this GitHub to do so.

#5. Integrating ChatGPT in Google Docs or Microsoft Word

You can integrate ChatGPT in both Google Docs and Microsoft Word to have all its power in your preferred text editor using the following GitHub.

6 ChatGPT mind-blowing extensions to use it anywhere
Screenshot of ChatGPT integrated in Google docs. Image by CesarHuret.

#6. Save everything you have generated in ChatGPT

Do you have deep and interesting conversations with ChatGPT and you would prefer saving them for re-reading — or maybe writing a book with alls its knowledge?

Then you can save all your conversations into a PDF, PNG, or HTML link using the following extension for Chrome, Edge, or Firefox.

6 ChatGPT mind-blowing extensions to use it anywhere
Image by liady.

#7. Additional feature — Twitter ChatGPT accounts.

Twitter has been flooded with bots that allow you to ask ChatGPT anything when you mention them instead of having to ask directly on the openAI webpage.

Some examples are:

https://mobile.twitter.com/chatwithgpt

https://twitter.com/ChatGPTBot/with_replies

Hope you find those ChatGPT extensions useful! 🙂

Josep Ferrer is an analytics engineer from Barcelona. He graduated in physics engineering and is currently working in the Data Science field applied to human mobility. He is a part-time content creator focused on data science and technology.

Original. Reposted with permission.

More On This Topic

  • 5 Things to Keep in Mind Before Selecting Your Next Data Science Job
  • Data Management: How to Stay on Top of Your Customer's Mind?
  • Visual ChatGPT: Microsoft Combine ChatGPT and VFMs
  • The Best Machine Learning Frameworks & Extensions for TensorFlow
  • 12 Essential VSCode Extensions for Data Science
  • Must-have Chrome Extensions For Machine Learning Engineers And Data…

Boost your machine learning model performance!

Sponsored Post

Boost your machine learning model performance!

Ensemble machine learning trains a diverse group of machine learning models to work together, aggregating their output to deliver richer results than a single model.

In Ensemble Methods for Machine Learning you’ll discover core ensemble methods that have proven records in both data science competitions and real-world applications. Hands-on case studies that show you how each algorithm works in production. By the time you're done, you'll know the benefits, limitations, and practical methods of applying ensemble machine learning to real-world data, and be ready to build more explainable ML systems.

Ensemble methods are a valuable tool. I can aggregate the strengths from multiple methods while mitigating their individual weaknesses and increasing model performance.

—Noah Flynn, Amazon

With each new chapter the author, Gautam Kunapuli, explains a unique case study that demonstrates a fully functional ensemble method, with examples including medical diagnosis, sentiment analysis, handwriting classification, and more. No complex math or theory—you’ll learn in a visuals-first manner, with ample code for easy experimentation!

Ensemble Methods for Machine Learning is available from its publisher Manning and from Amazon.

Our 35% discount code (good for all our products in all formats): nlkdnuggets21

Boost your machine learning model performance!

One free eBook code for Ensemble Methods for Machine Learning: enskdrf-413E

More On This Topic

  • How to Evaluate the Performance of Your Machine Learning Model
  • 7 Machine Learning Portfolio Projects to Boost the Resume
  • KDnuggets News, September 21: 7 Machine Learning Portfolio Projects to…
  • Machine Learning Model Development and Model Operations: Principles and…
  • Improving model performance through human participation
  • Production Machine Learning Monitoring: Outliers, Drift, Explainers &…

Chatting with the Future: Predictions for AI in the Next Decade

Chatting with the Future: Predictions for AI in the Next Decade
Image by Author Natural Language Processing

This one is a no-brainer. We’ve had ChatGPT, Google Bard and god knows what else has come out of the woodwork in the past month. So what is Natural Language Processing (NLP) and why did I mention ChatGPT and Google Bard?

NLP is the process of helping computers understand text data. Learning a language is already difficult for us humans, so you can imagine how difficult it is to teach a computer to understand text data. NLP uses various techniques such as Sentiment Analysis, Named Entity Recognition, Summarization, Text Classification, Lemmatization/stemming, and more.

ChatGPT and Google Bard are Large Language Models (LLM), deep-learning algorithms that can read, recognise, summarise, translate, predict, and also generate text. With this, they can predict future words and have a conversation with the user as if it was talking to a human. Learn more about LLMs here: Learn About Large Language Models.

ChatGPT and Google Bard seem to be competing with one another to see who will have the last laugh as the best large language model chatbot out there. This will mean that AI systems will become more adept at understanding and generating human language, requiring NLP to be at the forefront of this fight.

Multi-Purpose Chatbots

As we see a rise in chatbots, for example, ChatGPT and Google Bard. We know that they will not stay limited to only being able to return text. OpenAI announced that ChatGPT-4 is a multimodal model that will offer completely different possibilities – for example, videos, images, etc.

OpenAI’s DALL-E can create realistic images/art just by using a description in natural language. We should have seen it coming that OpenAI was planning to make ChatGPT-4 multimodal. Learn more about ChatGPT-4 here: GPT-4: Everything You Need To Know.

With that being said, sooner or later people will have a single model or chatbot that can answer their questions, create content, produce images, and more.

More Personalized

Imagine having a chatbot that can do exactly what you want. An AI system that is completely catered to you by having learnt the way you speak, the kind of questions you ask, the interests you have, etc.

We’re very much dealing with in on social media channels, for example, Instagram, and TikTok — where your data is being recorded to improve the recommendation system. With that being said if you have a tool that understands you as an individual, your preferences, behaviour, and needs — would this essentially eliminate the need for human interaction?

Increased Use of AI in Different Sectors

Taking into consideration everything that I stated above, it will be a bit silly to say that sooner or later these AI systems and tools will be a part of our everyday work life. I’m not sure about you, but a lot of my colleagues are already using chatbots such as Google Bard to help them create job specs. Regardless if it's the use of large language models or computer vision — AI will start to be a core part of work environments and processes.

There were times and still are when people were nervous and anxious about the use of AI. Due to the hype around it, and continuous investment and research going into it — more and more industries will adopt AI to improve these industries.

The financial industry has been using AI to help with fraud detection, anti-money laundering processes, and investment management. They might look into using chatbots to deal with an applicant's whole process, lowering their cost and tasks.

In the healthcare industry, machine learning algorithms are already being used to predict patient outcomes, help with the diagnosis of diseases, and assist in surgical procedures. Again, we’re looking at ways the healthcare industry can be improved.

This also accounts for AI continues to grow in the autonomous sector. Self-driving cars, robots, and drones will continue to grow and improve to the point that we may see a major fall in the need for humans.

Let's face it, we’re dealing with a high amount of workload in the majority of countries, with some dealing with unfortunately low salaries. If these roles were passed onto AI systems, robots, etc — would that be so bad? It’s hard to tell because with anything good — there has to be a bad, right? Let me know what you think in the comments.

Learn more by reading: The Future of Work: How AI is Changing the Job Landscape

Laws, Morals and Ethics

Up until now, the AI industry has had very little governing, ruling or constraints. It's basically been a wild west.

However, in recent years we’ve already seen some changes being made due to the rise of artificial intelligence. For example, the European AI act with the possibility that it may be considered a gold standard. Learn more about it here: European AI Act: The Simplified Breakdown.

In 2022, lawmakers and regulators worked hard to make sure things were going to change for the world of artificial intelligence in the year 2023. Lawmakers are finishing up amending the European AI Act mentioned before, which already had banned AI systems and fines in place in the initial drafts.

AI will continue to spread globally, and with that happening — governments, regulations, lawmakers, etc will have to work extra hard to stay focused on ensuring that AI systems are ethically correct, are not biased, are fair, and ensure customer privacy.

Wrapping Up

I can imagine everybody has their own thoughts and opinions of what they expect to happen in the next decade. I personally focused on these because it will also take a while before laws are put in place before AI systems can really become a part of our everyday personal and work lives.

Let me know what you think will happen with AI in the next decade in the comments
Nisha Arya is a Data Scientist, Freelance Technical Writer and Community Manager at KDnuggets. She is particularly interested in providing Data Science career advice or tutorials and theory based knowledge around Data Science. She also wishes to explore the different ways Artificial Intelligence is/can benefit the longevity of human life. A keen learner, seeking to broaden her tech knowledge and writing skills, whilst helping guide others.

More On This Topic

  • Future Says Series | Discover the Future of AI
  • The Importance of Permutation in Neural Network Predictions
  • Undersampling Will Change the Base Rates of Your Model's Predictions
  • Industry 2021 Predictions for AI, Analytics, Data Science, Machine Learning
  • KDnuggets™ News 20:n48, Dec 23: Crack SQL Interviews; MLOps — Why and…
  • The Future of Cloud is Now

11 Best Practices of Cloud and Data Migration to AWS Cloud

11 Best Practices of Cloud and Data Migration to AWS Cloud
Image by Editor

One of our customers – Ubicquia – A Provider of Intelligent IoT-based Smart City Solutions, wanted to migrate their workloads from one of the public cloud platforms to AWS due to end-customer demands for Compliance, Governance, and Security. As their Implementation Partner, Anblicks helped complete this migration, improving the cloud infrastructure's connectivity, reliability, performance, scalability, and cost efficiency. It also provided access to various Managed Service offerings from AWS, which helps the team deliver products faster and meet compliance requirements.

In today's digital landscape, most enterprises are increasingly turning towards cloud migration services to enhance their operations and stay ahead of the competition. The adoption of cloud-based solutions offers numerous benefits, including improved real-time performance, scalability, flexibility, and cost-effectiveness. By leveraging cloud services, enterprises can access advanced tools and technologies that streamline operations, enhance collaboration, and provide better customer experiences. Additionally, cloud-based solutions offer enhanced data security, disaster recovery, and business continuity capabilities, making them a preferred choice for enterprises of all sizes and industries.

While cloud migration services offer numerous benefits, enterprises face several common challenges during the migration process. It is essential to follow best practices such as assessing the current infrastructure, automating processes, starting small, evaluating the limitations of migration services, optimizing during migration, using secure and compliant data migration techniques, and conducting comprehensive testing to overcome these challenges.

11 Best Practices of Cloud and Data Migration to AWS Cloud

This article comprises a list of Best Practices compiled from our learnings during our migration journey to the AWS cloud. To ensure a seamless transition and reduce any interruptions to your operations, you can utilize these measures during the implementation of your migration.

1. Assess

Assessment of the architecture before migration should include more than just reviewing the hardware, software systems in place, and network and data storage configurations. Before finalizing the target architecture, the evaluators should assess the application and infrastructure's availability, maintainability, security, scalability, and performance requirements. Any bottlenecks identified during the assessment help us identify the areas of improvement and to make the required changes or upgrades during the migration. Prioritizing applications during the migration plan can be facilitated by assessing each application's business needs and identifying their criticality level. AWS Application Discovery Service is one example that can help discover your inventory before migrating your workloads to the AWS cloud.

Assessing the data sources for factors such as data size, structure, format, and compatibility with the target system is crucial in determining the optimal approach for migration and in pinpointing any potential complications that might emerge during data migration. For example, you may need to use a different migration strategy for a large data set than a smaller one. For systems where data loss prevention is of utmost importance, data migration with continuous replication to the target system till cutover would be essential. Additionally, if the data is in a proprietary format, you may need to convert it to a more generic format that the target systems are compatible with before migration. For example, the AWS DMS service provides Pre-Migration Assessment reports that can help recognize the compatibility issues that may arise during source data migration to AWS RDS.

2. Network Management

Plan your network architecture and consider the use of AWS Virtual Private Cloud (VPC) for secure and isolated network environments. Use AWS Direct Connect or VPN connections to establish secure and reliable connections between your on-premises network and AWS environment. Implement network monitoring and traffic analysis tools to identify and address network performance issues.

3. Migration cost

Analyze your existing infrastructure and identify areas where you can reduce costs, such as using reserved instances or leveraging AWS pricing models like spot instances. Use automation tools to minimize manual labor and reduce the total cost of migration.

And implement a cloud cost management strategy that includes regular monitoring and optimization of AWS resources to avoid unexpected expenses.

4. Automate

Similar to how automation can assist in other areas and fields, it can also streamline the migration process and minimize the likelihood of mistakes. By automating tasks such as data transfer and application deployments, you can improve the overall efficiency of the migration. Utilize AWS services like AWS DataSync, AWS Database Migration Service, and AWS Application and Server Migration Services. These services can help improve the migration's overall efficiency and make moving data and applications to the cloud easier.

5. Start Small

Starting with a small subset of data and a limited number of applications can be a good approach when migrating to any cloud. By doing so, you can evaluate the migration process, detect possible problems, and verify that it functions according to your expectations. This approach can also help you refine the migration process and make necessary adjustments before committing to a full migration. Additionally, starting small will also help you to get familiar with the process, tools, and resources that you need to complete a successful migration. With a phased approach, you can mitigate risks and minimize downtime during the migration.

6. Evaluate limitations of migration services

There are numerous migration services, but it's crucial to note that each service may have limitations and prerequisites. It's, therefore, essential to meticulously assess the functionalities of a service to guarantee that it aligns with the specific requirements of your migration. Also, it is important to consider factors such as network bandwidth, data size and complexity, and the overall migration timeline when planning your migration.

In 2017, Pearson, a global education company, experienced significant challenges during cloud migration. The migration caused significant downtime and disruptions to their services, leading to customer complaints and revenue losses.

7. Optimize during Migration

Cloud migration allows your organization to optimize costs and resources during the process. Identify resources and applications during the discovery phase which are no longer required. Discarding these unused resources can help save on costs. Furthermore, analysts can examine historical resource usage and pinpoint resources that are being underutilized. You can downsize these resources for cost optimization while moving to the cloud.

Also, it would be rational to avail of the benefits of AWS-managed services wherever possible. AWS provides managed services for many applications like databases, caches, etc. These services are inherently highly available, scalable, and secure. Moreover, the upgrades for these services are handled by AWS, thereby reducing the administrative efforts required to manage the resources.

8. Use Secure and Compliant Data Migration techniques

Data security and compliance are critical considerations when migrating to the cloud. AWS offers various services to help secure data at rest and in transit. For example, Amazon S3, RDS, and many other services provide encryption options for data at rest. While that takes care of the compliance requirements post-migration, it is also important to migrate data securely from your existing data sources to the cloud. During data migration, storage solutions and services should not be opened to the public or a broader network and should only be allowed from the target cloud systems. The use of encryption in transit also adds an extra layer of security.

9. Monitoring

Use AWS monitoring tools like Amazon CloudWatch to track resource utilization, detect potential issues, and trigger alerts based on predefined thresholds. Then Implement a centralized logging to gather and analyze log data across your AWS environment.

Use performance testing tools to ensure your applications and workloads run optimally in the new cloud environment.

10. Governance

Defining policies and procedures to manage access, permissions, and security in your AWS environment is important. Implement security best practices, such as SSO, multi-factor authentication, and encryption, to protect your data and infrastructure in the cloud. Use AWS service limits to control the use of AWS resources and prevent accidental overspending.

11. Comprehensive Testing

It is important to conduct thorough verification after migration to ensure that all applications and data have been successfully transferred and are working correctly. The process encompasses comprehensive testing of data integrity, performance, and security measures, with the ultimate goal of establishing a stable and secure system. One way to ensure the migrated system is free of errors or issues is by generating and executing test cases on the system. It is also good practice to have a rollback plan in case of any issues during the testing phase.

To Sum Up

Migrating to the cloud can become a complex and time-consuming process if not done correctly. But it brings significant benefits such as improved performance, scalability, cost savings, and security. By following Best Practices with the AWS Migration Framework – Assess, Mobilize, Migrate & Modernize; we can ensure a smooth and successful migration for our organization. Additionally, it is crucial to thoroughly understand the new cloud platform and take advantage of the various services and features AWS offers to optimize your workloads. Cloud migration can be valuable for organizations looking to improve their infrastructure and stay competitive in today's market.
Tonu Varughese is a highly skilled Sr. DevOps engineer with over 12+ years of experience in the technology industry. He specializes in cloud computing, DevOps practices, and Linux administration. He has a proven track record of designing, implementing, and maintaining robust and scalable infrastructure for various organizations.

More On This Topic

  • Data Science in the Cloud with Dask
  • Cloud Based Web Scraping for Big Data Applications
  • eBook: A Practical Guide to Using Third-Party Data in the Cloud
  • Build a Serverless News Data Pipeline using ML on AWS Cloud
  • New From Anaconda! Data Science Training and Cloud Hosted Notebooks
  • The Future of Cloud is Now

AutoGPT: Everything You Need To Know

AutoGPT: Everything You Need To Know
Image by Author

Over the past few weeks, we’ve been taking in a lot of heft news about ChatGPT, GPT-4, etc. Some of you have probably seen something around AutoGPT, but naturally and I don’t blame you; you probably thought it was just another GPT-Plugin or Chrome-Extension. But AutoGPT is more than that.

What is AutoGPT?

AutoGPT combines GPT-3.5 and GPT-4 via API, allowing projects to be created that have been iterating on their own prompts and reviewing each iteration to improve and build upon it. How does this work exactly?

AutoGPT requires:

  • AI Name
  • AI Role
  • Up to 5 goals

For example:

  • Name: Chef-GPT
  • Role: An AI designed to find an ordinary recipe on the web, and turn it into a Michelin Star quality recipe.
  • Goal 1: Find a simple recipe online
  • Goal 2: Turn this simple recipe into a Michelin Star quality version.

Once AutoGPT has met the description and goals, it will start to do its own thing until the project is at a satisfactory level.

So what’s so good about AutoGPT? Well first thing first, it is important to note that GPT has the ability to write its own code using GPT-4. It also executes Python scripts which allow it to recursively debug, develop, build and continuously self-improve. Crazy right? AutoGPT is a self-improving AI — showing true AGI (Artificial General Intelligence) capabilities.

AutoGPT’s feedback loop looks like this:

  1. Plan
  2. Criticize
  3. Act
  4. Read Feedback
  5. Plan

AutoGPT will read and write different files, and browse the web, along with looking back and reviewing its own prompts — just to ensure the project is what the user wants. You give it a goal, it scrapes the web for the best information out there, and then it autonomously does the task for you and continues to constantly improve itself.

AutoGPT will ask you for permission after every prompt, to ensure that the project is going in the right direction.

Here is an example of AutoGPT creating an app for Varun Mayya, a Computer Science Engineer. AutoGPT recognized that Varun did not have a Node, so it googled how to install Node, where AutoGPT then found a Stackoverflow article with a link, downloaded it, extracted it, and then spawned the server on Varun's behalf.

How Can I Use AutoGPT?

In order to use AutoPGT, credits will be used from your OpenAI-account. However, you can use up to 18$ which is included in the free version.

As I mentioned above, AutoGPT requires your permission after every prompt, meaning you will need to do a lot of testing. This allows you to test and cater your AI project to how you want it before it costs you anything.

Installation and Requirements

In order to use AutoGPT, you will need:

  • Python 3.8 or later
  • OpenAI API key
  • GPT-4 API Access
  • PINECONE API key
  • ElevenLabs API for text-to-speech projects

In your CMD, Bash or Powershell window, clone the repository:

git clone https://github.com/Torantulino/Auto-GPT.git

Go to the project directory:

cd 'Auto-GPT'

Install the required dependencies:

pip install -r requirements.txt

You then need to navigate to the folder and rename .env.template to .env. Once this is done, open .env. You want to then replace the Keys with your OPENAI_API_KEY.

If you are using it for speech purposes, you will need to fill in your ELEVEN_LABS_API_KEY as well.

How to get your keys:

  • OpenAI API key from: https://platform.openai.com/account/api-keys.
  • ElevenLabs API key from: https://elevenlabs.io.

Once this is all done and successful, you want to run in your CMD, Bash or Powershell window:

python scripts/main.py

You’re ready to start using AutoGPT!

If you have any issues, please refer to GitHub.

AutoGPT Demo

You can download the demo video from the Auto-GPT GitHub repository.

Wrapping Up

I’ve been browsing news about AutoGPT on Twitter, LinkedIn, YouTube, and more. It seems like everybody has a different perspective and experience on the actual capabilities of AutoGPT. If you’ve had a chance to use AutoGPT, let us know in the comments what you’ve been able to create so far.

If you want to keep up with the future of AutoGPT, I would recommend following the brains behind it on Twitter: SigGravitas

What do you think is going to be next in the world of AI?

Nisha Arya is a Data Scientist, Freelance Technical Writer and Community Manager at KDnuggets. She is particularly interested in providing Data Science career advice or tutorials and theory based knowledge around Data Science. She also wishes to explore the different ways Artificial Intelligence is/can benefit the longevity of human life. A keen learner, seeking to broaden her tech knowledge and writing skills, whilst helping guide others.

A Step-by-Step Guide to Web Scraping with Python and Beautiful Soup

A Step-by-Step Guide to Web Scraping with Python and Beautiful Soup
Image by Author

Web scraping is a technique that is used for extracting HTML content from different websites. These web scrapers are mainly computer bots that can directly access the World Wide Web using HTTP Protocol and use this information in various applications. The data is obtained in an unstructured format, which is then converted into a structured manner after performing multiple pre-processing steps. Users can save this data in a spreadsheet or export it through an API.

Web scraping can also be done manually for small web pages by simply copying and pasting the data from the web page. But this copy and pasting would not work if we require data at a large scale and from multiple web pages. Here automated web scrapers come into the picture. They use intelligent algorithms which can extract large amounts of data from numerous web pages in less time.

Uses of Web Scraping

Web scraping is a powerful tool for businesses to gather and analyze information online. It has multiple applications across various industries. Below are some of these that you can check out.

  1. Marketing: Web scraping is used by many companies to collect information about their products or services from various social media websites to get a general public sentiment. Also, they extract email ids from various websites and then send bulk promotional emails to the owners of these email ids.
  1. Content Creation: Web scraping can gather information from multiple sources like news articles, research reports, and blog posts. It helps the creator to create quality and trending content.
  1. Price Comparison: Web scraping can be used to extract the prices of a particular product across multiple e-commerce websites to give a fair price comparison for the user. It also helps companies fix the optimal pricing of their products to compete with their competitors.
  1. Job Postings: Web Scraping can also be used to collect data on various job openings across multiple job portals so that this information can help many job seekers and recruiters.

Now, we will create a simple web scraper using Python and Beautiful Soup library. We will parse an HTML page and extract useful information from it. This tutorial requires a basic understanding of Python as its only prerequisite.

Code Implementation

Our implementation consists of four steps which are given below.

A Step-by-Step Guide to Web Scraping with Python and Beautiful Soup
Fig. 1 Tutorial Steps | Image by Author

Setting Up the Environment

Create a separate directory for the project and install the below libraries using the command prompt. Creating a virtual environment first is preferable, but you can also install them globally.

$ pip install requests  $ pip install bs4

The requests module extracts the HTML content from a URL. It extracts all the data in a raw format as a string that needs further processing.

The bs4 is the Beautiful Soup module. It will parse the raw HTML content obtained from the `request` module in a well-structured format.

Get the HTML

Create a Python file inside that directory and paste the following code.

import requests    url = "https://www.kdnuggets.com/"  res = requests.get(url)  htmlData = res.content  print(htmlData)

Output:

A Step-by-Step Guide to Web Scraping with Python and Beautiful Soup
Image by Author

This script will extract all the raw HTML content from the URL `/`. This raw data contains all the texts, paragraphs, anchor tags, divs, etc. Our next task is to parse that data and extract all the texts and tags separately.

Parse the HTML

Here the role of Beautiful Soup comes in. It is used to parse and prettify the raw data obtained above. It creates a tree-like structure of our DOM, which can be traversed along the tree branches and able to find the target tags and objects.

import requests  from bs4 import BeautifulSoup    url = "https://www.kdnuggets.com/"  res = requests.get(url)  htmlData = res.content  parsedData = BeautifulSoup(htmlData, "html.parser")  print(parsedData.prettify())

Output:

A Step-by-Step Guide to Web Scraping with Python and Beautiful Soup
Image by Author

You can see in the above output that Beautiful Soup has presented the content in a more structured format with proper indentations. The function BeautifulSoup() takes two arguments, one is the input HTML, and another is a parser. We are currently using html.parser, but there are other parsers as well, like lxml or html5lib. All of them have their own pros and cons. Some have better leniency, while some are very fast. The selection of the parser entirely depends on the user's choice. Below is the list of parsers with their pros and cons that you can checkout.

A Step-by-Step Guide to Web Scraping with Python and Beautiful Soup
Fig. 2 List of Parsers | Image by crummy HTML Tree Traversal

In this section, we will understand the tree structure of HTML and then extract the title, different tags, classes, lists, etc., from the parsed content using Beautiful Soup.

A Step-by-Step Guide to Web Scraping with Python and Beautiful Soup
Fig. 3 HTML Tree Structure | Image by w3schools

The HTML tree represents a hierarchical information view. The root node is the <html> tag, which can have parents, children and siblings. The head tag and body tag follow the HTML tag. The head tag contains the metadata and the title, and the body tag contains the divs, paragraphs, heading, etc.

When an HTML document is passed through Beautiful Soup, it converts the complex HTML content into four major Python objects; these are

  1. BeautifulSoup:

It represents the parsed document as a whole. It is the complete document that we are trying to scrap.

soup = BeautifulSoup("<h1> Welcome to KDnuggets! </h1>", "html.parser")  print(type(soup))

Output:

<class 'bs4.BeautifulSoup'>

You can see the entire html content is an object of type Beautiful Soup.

  1. Tag:

The tag object corresponds to a particular tag in the HTML document. It can extract a tag from the whole document and return the first found tag if multiple tags with the same name are present in the DOM.

soup = BeautifulSoup("<h1> Welcome to KDnuggets! </h1>", 'html.parser')  print(type(soup.h1))

Output:

<class 'bs4.element.Tag'>
  1. NavigableString:

It contains the text inside a tag in string format. Beautiful Soup uses the NavigableString object to store the texts of a tag.

soup = BeautifulSoup("<h1> Welcome to KDnuggets! </h1>", "html.parser")  print(soup.h1.string)  print(type(soup.h1.string))

Output:

Welcome to KDnuggets!   <class 'bs4.element.NavigableString'>
  1. Comments:

It reads the HTML comments that are present inside a tag. It is a special type of NavigableString.

soup = BeautifulSoup("<h1><!-- This is a comment --></h1>", "html.parser")  print(soup.h1.string)  print(type(soup.h1.string))

Output:

 This is a comment   <class 'bs4.element.Comment'>

Now, we will extract the title, different tags, classes, lists, etc., from the parsed HTML content.

1. Title

Getting the title of the HTML page.

print(parsedData.title)

Output:

<title>Data Science, Machine Learning, AI &amp; Analytics - KDnuggets</title>

Or, you can also print the title string only.

print(parsedData.title.string)

Output:

Data Science, Machine Learning, AI & Analytics - KDnuggets

2. Find and Find All

These functions are useful when you want to search for a specific tag in the HTML content. Find() will give only the first occurrence of that tag, while find_all() will give all the occurrences of that tag. You can also iterate through them. Let’s see this with an example below.

find():

h2 = parsedData.find('h2')  print(h2)

Output:

<h2>Latest Posts</h2>

find_all():

H2s = parsedData.find_all("h2")  for h2 in H2s:      print(h2)

Output:

<h2>Latest Posts</h2>  <h2>From Our Partners</h2>  <h2>Top Posts Past 30 Days</h2>  <h2>More Recent Posts</h2>  <h2 size="+1">Top Posts Last Week</h2>

This will return the complete tag, but if you want to print only the string, you can write like that.

h2 = parsedData.find('h2').text  print(h2)

We can also get the class, id, type, href, etc., of a particular tag. For example, getting the links of all the anchor tags present.

anchors = parsedData.find_all("a")  for a in anchors:      print(a["href"])

Output:

A Step-by-Step Guide to Web Scraping with Python and Beautiful Soup
Image by Author

You can also get the class of every div.

divs = parsedData.find_all("div")  for div in divs:      print(div["class"])

3. Finding Elements using Id and Class Name

We can also find specific elements by giving a particular id or a class name.

tags = parsedData.find_all("li", class_="li-has-thumb")  for tag in tags:      print(tag.text)

This will print the text of all the lis which belong to the li-has-thumb class. But writing the tag name is not always necessary if you are unsure about it. You can also write like this.

tags = parsedData.find_all(class_="li-has-thumb")  print(tags)  

It will fetch all the tags with this class name.

Now, we will discuss some more interesting methods of Beautiful Soup

Some more Methods of Beautiful Soup

In this section, we will discuss some more functions of Beautiful Soup that will make your work easier and faster.

  1. select()

The select() function allows us to find specific tags based on CSS selectors. CSS selectors are patterns that select certain HTML tags based on their class, id, attribute, etc.

Below is the example to find the image with the alt attribute starting withKDnuggets.

data = parsedData.select("img[alt*=KDnuggets]")  print(data)

Output:

A Step-by-Step Guide to Web Scraping with Python and Beautiful Soup

  1. parent

This attribute returns the parent of a given tag.

tag = parsedData.find('p')  print(tag.parent)
  1. contents

This attribute returns the contents of the selected tag.

tag = parsedData.find('p')  print(tag.contents)
  1. attrs

This attribute is used to get the attributes of a tag in a dictionary.

tag = parsedData.find('a')  print(tag.attrs)
  1. has_attr()

This method checks if a tag has a particular attribute.

tag = parsedData.find('a')  print(tag.has_attr('href'))

It will return True if the attribute is present, otherwise returns False.

  1. find_next()

This method finds the next tag after a given tag. It takes the name of the input tag that it needs to find next.

first_anchor = parsedData.find("a")  second_anchor = first_anchor.find_next("a")  print(second_anchor)
  1. find_previous()

This method is used to find the previous tag after a given tag. It takes the name of the input tag that it needs to find next.

second_anchor = parsedData.find_all('a')[1]  first_anchor = second_anchor.find_previous('a')  print(first_anchor)

It will print the first anchor tag again.

There are many other methods that you can give a try. These methods are available in this documentation of the Beautiful Soup.

Conclusion

We have discussed web scraping, its uses, and its Python and Beautiful Soup implementation. It is all for today. Feel free to comment below if you have any comments or suggestions.
Aryan Garg is a B.Tech. Electrical Engineering student, currently in the final year of his undergrad. His interest lies in the field of Web Development and Machine Learning. He have pursued this interest and am eager to work more in these directions.

More On This Topic

  • How to become a Data Scientist: a step-by-step guide
  • How To Structure a Data Science Project: A Step-by-Step Guide
  • A Guide On How To Become A Data Scientist (Step By Step Approach)
  • A step-by-step guide for creating an authentic data science portfolio…
  • KDnuggets™ News 20:n39, Oct 14: A step-by-step guide for creating an…
  • Step by Step Building a Vacancy Tracker Using Tableau